IDE Integration with Cypress
Cypress integrates with the IDEs and code editors you already use, including Visual Studio Code, JetBrains IDEs, Vim, and more.
Because Cypress tests are written in JavaScript or TypeScript, your editor's existing language tooling applies to your test code, and Cypress ships with TypeScript type declarations so autocomplete works with little or no setup.
Most of this guide applies to any editor. The Extensions and plugins section covers tooling specific to VS Code, JetBrains IDEs, Vim, and VS Code forks like Cursor.
Recommended setup
Five steps give you a fully configured editor in a few minutes:
- Turn on IntelliSense. In a TypeScript project, add
"types": ["cypress"]to yourtsconfig.json. In a JavaScript project, add a triple slash directive to your spec files or ajsconfig.jsonto your project root. - Install
eslint-plugin-cypressso your editor recognizes Cypress globals and flags anti-patterns as you type. See Linting. - Set your file opener preference the first time you click a file path in the Cypress app, so errors and stack traces open directly in your editor.
- Add Cypress AI Skills to your AI agent. If
you use an AI coding assistant, run
npx skills add cypress-io/ai-toolkitto teach it Cypress best practices for authoring, explaining, and reviewing tests. - Install the Cloud MCP server. If you
record runs to Cypress Cloud, connect
your AI assistant to
https://mcp.cypress.io/mcpso it can investigate failed and flaky tests without leaving your editor.
The rest of this guide covers each step in detail, plus editor-specific extensions and AI tooling.
Intelligent code completion
IntelliSense gives you intelligent code suggestions directly in your IDE while writing tests. A typical IntelliSense popup shows the command definition, a code example, and a link to the full documentation page.
What IntelliSense gives you
Command autocomplete
As you type, your editor suggests every available Cypress command and chained method, with inline documentation for each.
Signature help and inline docs
Typing or hovering on a command shows its full signature, argument types, a usage example, and a link to its documentation page.
DOM-aware assertion autocomplete
Assertion chains autocomplete too. When the subject is a DOM element, Cypress narrows the suggestions to DOM assertions.
Set up IntelliSense
This guide assumes you have installed Cypress.
Cypress comes with TypeScript type declarations included, which your editor uses to show IntelliSense inside spec files.
TypeScript projects: IntelliSense works out of the box once your
tsconfig.json is configured
with "types": ["cypress"]. See
TypeScript support for the complete setup,
including types for custom commands.
JavaScript projects: use one of the approaches below.
Triple slash directives
The simplest way to see IntelliSense when typing a Cypress command or assertion is to add a triple-slash directive to the head of your JavaScript or TypeScript testing file. This turns IntelliSense on for that file. Copy the comment line below and paste it into your spec file.
/// <reference types="Cypress" />
If you write custom commands and provide
TypeScript definitions for them, you can use triple slash directives to show
IntelliSense for those too, even if your project uses only JavaScript. For
example, if you describe your custom commands in
cypress/support/index.d.ts, use:
// type definitions for Cypress object "cy"
/// <reference types="cypress" />

// type definitions for custom commands like "createDefaultTodos"
/// <reference types="../support" />
Reference type declarations via jsconfig
Instead of adding triple slash directives to each JavaScript spec file, some
IDEs (like VS Code) understand a common jsconfig.json file in the root of the
project. In that file, include the Cypress module and your test folders:
{
  "include": [
    "./node_modules/cypress",
    "cypress/**/*.js"
  ]
}
IntelliSense should now show help for cy commands inside regular JavaScript
spec files.
If your editor doesn't support jsconfig.json, a
tsconfig.json with
allowJs enabled works the same way for JavaScript spec files:
{
  "compilerOptions": {
    "allowJs": true,
    "types": ["cypress"]
  },
  "include": ["cypress/**/*.js"]
}
IntelliSense isn't working?
If you don't see Cypress suggestions in your spec files, work through these common causes:
- Cypress types aren't visible to your spec files. Confirm that
"types": ["cypress"]appears in thetsconfig.json(orjsconfig.json) that actually covers your spec files. A config in another folder may not include yourcypressdirectory in itsincludepatterns. - Your editor is using stale type information. Restart the TypeScript
server. In VS Code, open the command palette (
cmd+shift+pon Mac,ctrl+shift+pon Windows) and run "TypeScript: Restart TS Server". If that doesn't help, restart the editor. - Jest types are clashing with Cypress types. If your project also uses
Jest,
@types/jestdefines the same globals (describe,it,expect) and can override Cypress's definitions. See Clashing types with Jest. - Your editor is using a different TypeScript version. In VS Code, run "TypeScript: Select TypeScript Version" from the command palette and choose your workspace version.
Linting
The official
eslint-plugin-cypress
integrates with any ESLint-capable editor. It configures Cypress and Mocha
globals, eliminating false "undefined variable" errors in spec files, and
provides lint rules that flag Cypress anti-patterns as you write tests.
See the full rules list.
Open files in your IDE
When you click a file path or an error in the command log, Cypress opens the file on your system. If the editor supports inline highlighting, the file opens with the cursor located on the line and column of interest, taking you from a failing test to the responsible code in one click.
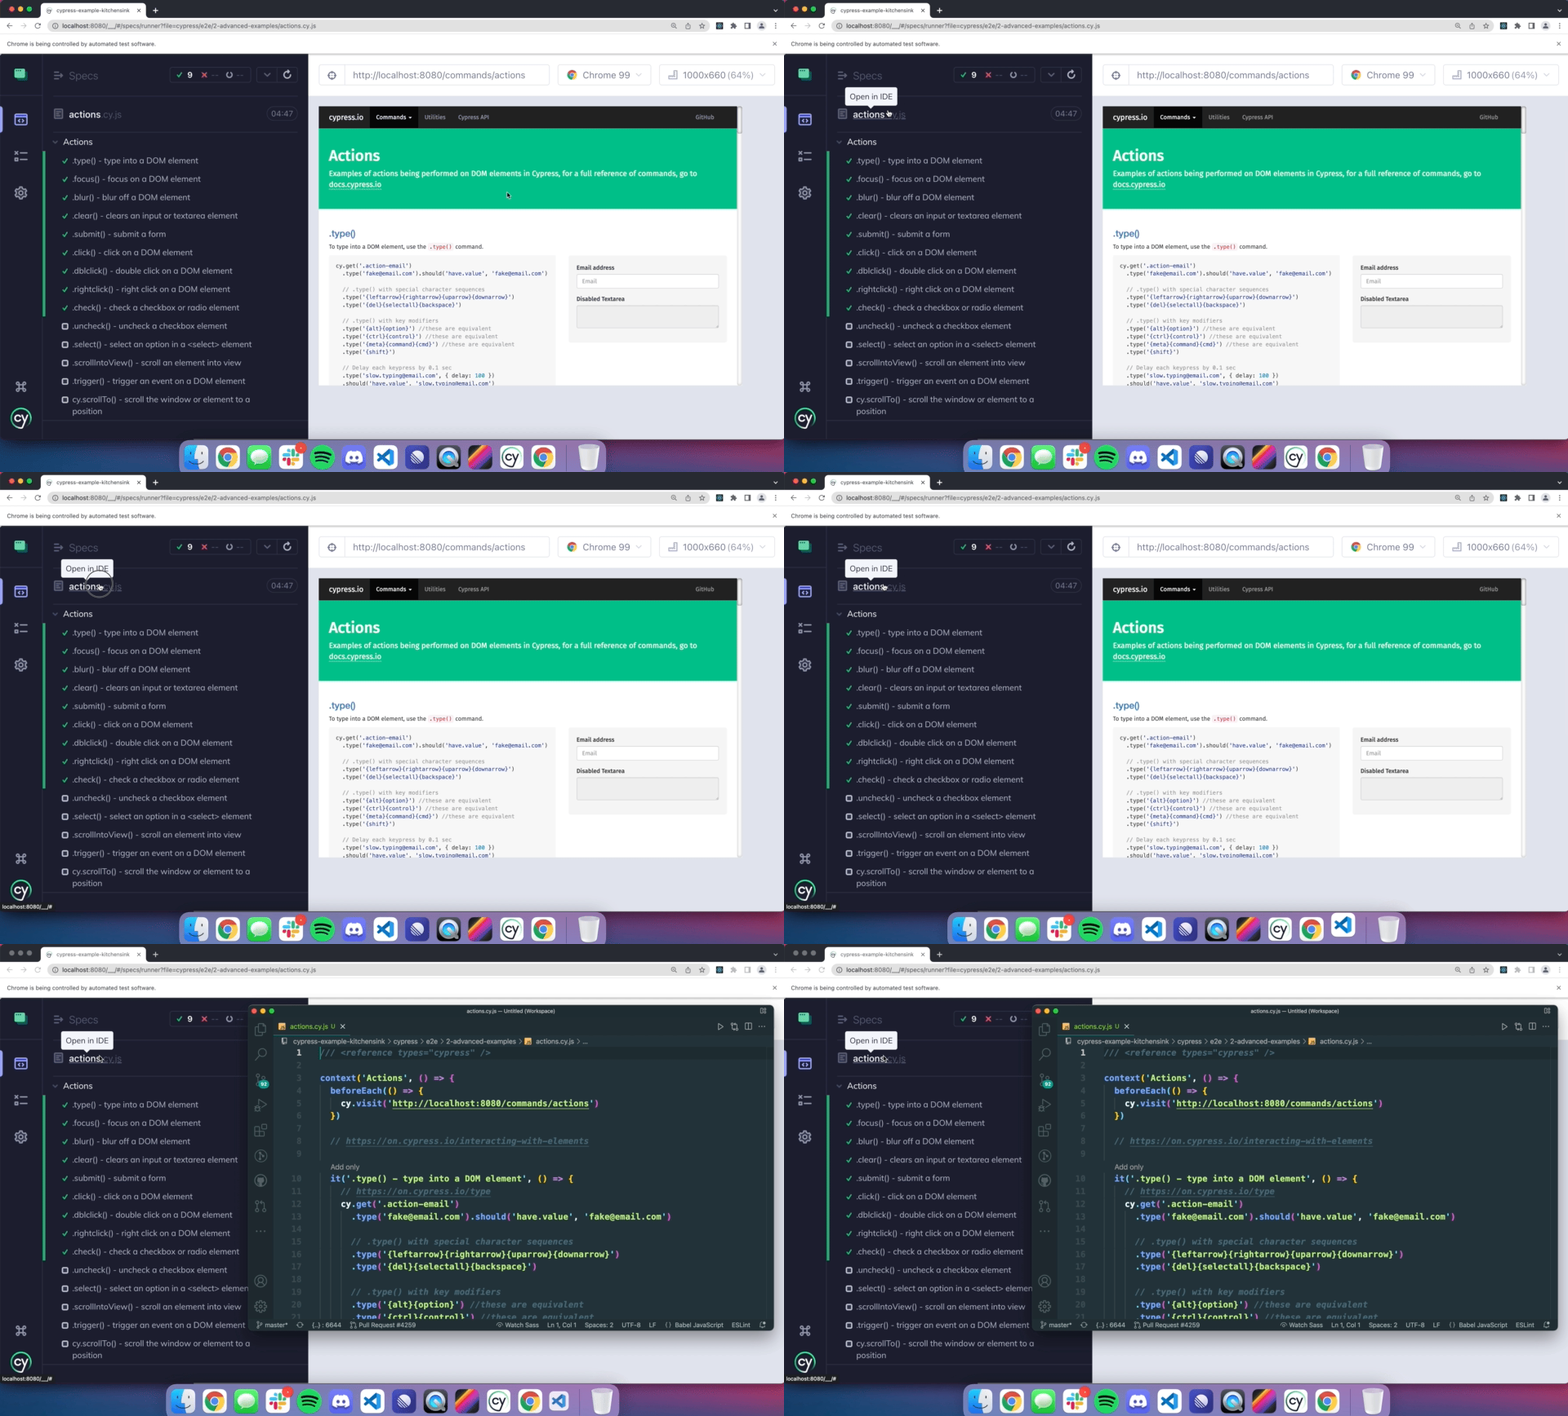
The first time you click a file path, Cypress prompts you to select where you prefer to open the file. You can choose to open it in your:
- File system (e.g. Finder on macOS, File Explorer on Windows)
- An IDE located on your system
- A specified application path
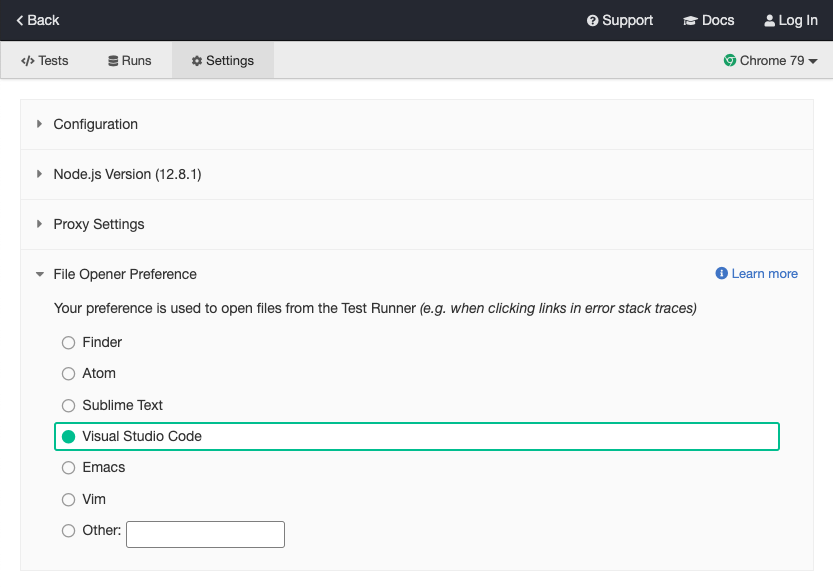
Cypress attempts to find available file editors on your system and display those as options. If your preferred editor is not listed, you can specify the (full) path to it by selecting Other. Cypress will make every effort to open the file, but it is not guaranteed to work with every application.
After setting your file opener preference, files automatically open in your selected application without prompting you to choose. To change your selection, go to the Settings tab of Cypress and click under File Opener Preference.
Edit tests inside Cypress with Studio
Integration works in both directions: your IDE connects to Cypress, and the Cypress app offers an IDE-like editing experience of its own through Cypress Studio. For end-to-end tests, Studio opens a code panel alongside your running test, so you can see and edit the code of each test while you debug it, right next to the application it's testing.
Inside the Studio panel you can:
- Watch test code write itself as you interact. Studio translates clicks, typing, and selections in your app into Cypress commands in real time, and you see each command appear in the code panel as it's written.
- Edit test code inline. Change any part of the test directly in the code panel, with undo, redo, and reset. Saving writes to your spec file on disk, so the changes are immediately visible in your IDE too.
- Debug failing tests where they fail. When a line causes a test failure, Studio highlights that line in the code panel. You can fix it there and save, without reproducing the failure separately in your editor.
- Review AI recommendations inline. With Studio AI (requires a Cypress Cloud connection), suggested assertions appear directly in your test code as you record, each with an AI-generated comment explaining what it validates. Hover to see before and after DOM snapshots of what changed, run the test to verify a suggestion passes, then accept or reject each one.
Studio complements your IDE rather than replacing it. Use Studio for the parts of test authoring that benefit from seeing the app live, such as recording interactions, picking selectors, and choosing assertions, and your IDE for everything else.
Debugging from your IDE
Cypress tests run in the browser, not in Node.js, so you can't attach your editor's Node debugger to a running test. Debugging happens in the browser instead:
- Use the browser's Developer Tools together with
debugger,.debug(), andcy.pause()to halt a test mid-run and inspect your application's state. - Your editor's Node debugger still applies to the parts of Cypress that run
in Node: the
setupNodeEventsfunction in your Cypress configuration and anycy.task()code.
See the Debugging guide for the full workflow, including source maps, step-through debugging, and console logs.
Extensions and plugins
Editor extensions add deeper Cypress integration: running specs from the
editor, navigating to custom command definitions, and managing .only /
.skip modifiers.
Except where noted, these extensions are built and maintained by community authors, not by Cypress. Before adopting one, check its marketplace listing for recent updates and compatibility with your Cypress version.
Visual Studio Code
- Cypress Test Explorer:
Discover, navigate, and run Cypress tests from VS Code's native Testing
sidebar. Reads the
specPatternfrom your Cypress configuration and lets you run tests headlessly or open them in the Cypress app. - Cypress Helper: Go-to-definition for custom commands, autocomplete for fixtures and aliases, and code lenses to open specs in Cypress.
- Test Utils:
Add or remove
.onlyand.skipmodifiers with keyboard shortcuts or the command palette. Works with Cypress and other Mocha-style test frameworks.
Standardize your team's setup by committing a .vscode/extensions.json
file to your repository. VS Code prompts everyone who opens the project to
install the recommended extensions:
{
  "recommendations": [
    "dbaeumer.vscode-eslint",
    "dpanshug.cypress-test-explorer"
  ]
}
Using Cursor, Windsurf, or another VS Code fork? These editors install extensions from the Open VSX registry rather than the Visual Studio Marketplace, so some extensions above may not be available.
JetBrains IDEs
- Test Automation: The official plugin developed and maintained by JetBrains, with dedicated Cypress support. Run and debug tests from the editor across IntelliJ IDEA Ultimate, WebStorm, PhpStorm, PyCharm, GoLand, Rider, RubyMine, and other JetBrains IDEs. It includes the test automation capabilities previously offered in JetBrains Aqua, which was discontinued in 2025.
- Cypresso (formerly "Cypress Support"): A community plugin that integrates Cypress under the common IntelliJ test framework, with run configurations, debugging, and Cucumber support. Requires a JetBrains IDE with JavaScript support, such as IntelliJ IDEA Ultimate or WebStorm.
Vim and Neovim
- vim-test: A multi-framework test runner with a dedicated Cypress runner. Run the nearest test, the current file, or the whole suite from Vim. Neovim users can use it through neotest-vim-test.
AI-assisted Cypress workflows
If you use an AI coding assistant in your editor, such as Cursor, GitHub Copilot, or Claude Code, Cypress provides official tooling to make it better at writing and maintaining tests:
- Cypress AI Skills: Instruction sets that teach your AI tool Cypress best practices for authoring, explaining, and reviewing tests: durable selectors, correct APIs for your Cypress version, and your project's existing conventions.
- Cloud MCP: Connect your AI assistant to Cypress Cloud so it can pull real run data, including failed and flaky tests, accessibility results, and Test Replay links, to investigate and fix failures without leaving your editor.
For an overview of all AI capabilities across the Cypress App and Cloud, see Cypress AI.