Network Requests
What you'll learn
- Strategies for testing network requests in Cypress
- How to stub and wait for network responses
- Best practices for testing GraphQL queries and mutations
Note: If you're looking for a resource to make an HTTP request take a look at cy.request()
Testing Strategies
Cypress helps you test the entire lifecycle of HTTP requests within your application. Cypress provides you access to the objects with information about the request, enabling you to make assertions about its properties. Additionally you can even stub and mock a request's response.
Common testing scenarios:
- Asserting on a request's body
- Asserting on a request's url
- Asserting on a request's headers
- Stubbing a response's body
- Stubbing a response's status code
- Stubbing a response's headers
- Delaying a response
- Waiting for a response to happen
Within Cypress, you have the ability to choose whether to stub responses or allow them to actually hit your server. You can also mix and match within the same test by choosing to stub certain requests, while allowing others to hit your server.
Let's investigate both strategies, why you would use one versus the other, and why you should regularly use both.
Use Server Responses
Requests that are not stubbed actually reach your server. By not stubbing your responses, you are writing true end-to-end tests. This means you are driving your application the same way a real user would.
When requests are not stubbed, this guarantees that the contract between your client and server is working correctly.
In other words, you can have confidence your server is sending the correct data in the correct structure to your client to consume. It is a good idea to have end-to-end tests around your application's critical paths. These typically include user login, signup, or other critical paths such as billing.
There are downsides to not stubbing responses you should be aware of:
- Since no responses are stubbed, that means your server has to actually send real responses. This can be problematic because you may have to seed a database before every test to generate state. For instance, if you were testing pagination, you'd have to seed the database with every object that it takes to replicate this feature in your application.
- Since real responses go through every single layer of your server (controllers, models, views, etc) the tests are often much slower than stubbed responses.
If you are writing a traditional server-side application where most of the responses are HTML you will likely have few stubbed responses. However, most modern applications that serve JSON can take advantage of stubbing.
- More likely to work in production
- Test coverage around server endpoints
- Great for traditional server-side HTML rendering
- Requires seeding data
- Much slower
- Harder to test edge cases
- Use sparingly
- Great for the critical paths of your application
- Helpful to have one test around the happy path of a feature
Stub Responses
Stubbing responses enables you to control every aspect of the response,
including the response body, the status, headers, and even network
delay. Stubbing is extremely fast, most responses will be returned in less
than 20ms.
Stubbing responses is a great way to control the data that is returned to your client.
You don't have to do any work on the server. Your application will have no idea its requests are being stubbed, so there are no code changes needed.
- Control of response bodies, status, and headers
- Can force responses to take longer to simulate network delay
- No code changes to your server or client code
- Fast, < 20ms response times
- No guarantee your stubbed responses match the actual data the server sends
- No test coverage on some server endpoints
- Not as useful if you're using traditional server side HTML rendering
- Use for the vast majority of tests
- Mix and match, typically have one true end-to-end test, and then stub the rest
- Perfect for JSON APIs
Real World Example
The Cypress Real World App (RWA) end-to-end tests predominately rely on server responses, and only stub network responses on a few occasions to conveniently create edge-case or hard-to-create application states.
This practice allows the project to achieve full code-coverage for the front end and back end of the app, but this has also required creating intricate database seeding or test data factory scripts that can generate appropriate data in compliance with the business-logic of the app.
Check out any of the Real World App test suites to see Cypress network handling in action.
Stubbing
Cypress enables you to stub a response and control the body, status,
headers, or even delay.
cy.intercept() is used to control the behavior of
HTTP requests. You can statically define the body, HTTP status code, headers,
and other response characteristics.
See cy.intercept() for more information and for examples on stubbing responses.
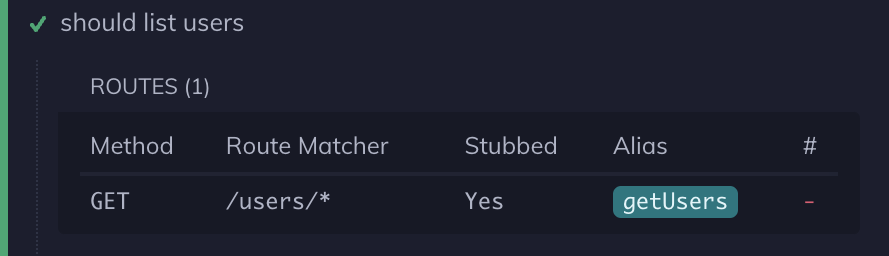
Routing
cy.intercept(
  {
    method: 'GET', // Route all GET requests
    url: '/users/*', // that have a URL that matches '/users/*'
  },
  [] // and force the response to be: []
).as('getUsers') // and assign an alias
When you use cy.intercept() to define a route,
Cypress displays this under "Routes" in the Command Log.
When a new test runs, Cypress will restore the default behavior and remove all
routes and stubs. For a complete reference of the API and options, refer to the
documentation for cy.intercept().
Fixtures
A fixture is a fixed set of data located in a file that is used in your tests.
The purpose of a test fixture is to ensure that there is a well known and fixed
environment in which tests are run so that results are repeatable. Fixtures are
accessed within tests by calling the cy.fixture()
command.
With Cypress, you can stub network requests and have it respond instantly with fixture data.
When stubbing a response, you typically need to manage potentially large and complex JSON objects. Cypress allows you to integrate fixture syntax directly into responses.
// we set the response to be the activites.json fixture
cy.intercept('GET', '/activities/*', { fixture: 'activities.json' })
Organizing
Cypress automatically scaffolds out a suggested folder structure for organizing
your fixtures on every new project. By default it will create an example.json
file when you add your project to Cypress.
/cypress/fixtures/example.json
Your fixtures can be further organized within additional folders. For instance,
you could create another folder called images and add images:
/cypress/fixtures/images/cats.png
/cypress/fixtures/images/dogs.png
/cypress/fixtures/images/birds.png
To access the fixtures nested within the images folder, include the folder in
your cy.fixture() command.
cy.fixture('images/dogs.png') // yields dogs.png as Base64
Waiting
Whether or not you choose to stub responses, Cypress enables you to
declaratively cy.wait() for requests and their
responses.
Not sure how to structure intercepts and waits for your specific use case? Use the /cypress-author skill with your AI coding tool to generate the right pattern, or /cypress-explain to understand why a pattern is used before you change it. See Cypress AI Skills.
This following section utilizes a concept known as Aliasing. If you're new to Cypress you might want to check that out first.
Here is an example of aliasing requests and then subsequently waiting on them:
- End-to-End Test
- Component Test
cy.intercept('/activities/*', { fixture: 'activities' }).as('getActivities')
cy.intercept('/messages/*', { fixture: 'messages' }).as('getMessages')

// visiting the dashboard should make requests that match
// the two routes above
cy.visit('http://localhost:8888/dashboard')

// pass an array of Route Aliases that forces Cypress to wait
// until it sees a response for each request that matches
// each of these aliases
cy.wait(['@getActivities', '@getMessages'])

// these commands will not run until the wait command resolves above
cy.get('h1').should('contain', 'Dashboard')
cy.intercept('/activities/*', { fixture: 'activities' }).as('getActivities')
cy.intercept('/messages/*', { fixture: 'messages' }).as('getMessages')

// mounting the dashboard should make requests that match
// the two routes above
cy.mount(<Dashboard />)

// pass an array of Route Aliases that forces Cypress to wait
// until it sees a response for each request that matches
// each of these aliases
cy.wait(['@getActivities', '@getMessages'])

// these commands will not run until the wait command resolves above
cy.get('h1').should('contain', 'Dashboard')
If you would like to check the response data of each response of an aliased
route, you can use several cy.wait() calls.
cy.intercept({
  method: 'POST',
  url: '/myApi',
}).as('apiCheck')

cy.visit('/')
cy.wait('@apiCheck').then((interception) => {
  assert.isNotNull(interception.response.body, '1st API call has data')
})

cy.wait('@apiCheck').then((interception) => {
  assert.isNotNull(interception.response.body, '2nd API call has data')
})

cy.wait('@apiCheck').then((interception) => {
  assert.isNotNull(interception.response.body, '3rd API call has data')
})
Waiting on an aliased route has big advantages:
- Tests are more robust with much less flake.
- Failure messages are much more precise.
- You can assert about the underlying request object.
Let's investigate each benefit.
Flake
One advantage of declaratively waiting for responses is that it decreases test
flake. You can think of cy.wait() as a guard that
indicates to Cypress when you expect a request to be made that matches a
specific routing alias. This prevents the next commands from running until
responses come back and it guards against situations where your requests are
initially delayed.
Auto-complete Example:
What makes this example below so powerful is that Cypress will automatically
wait for a request that matches the getSearch alias. Instead of forcing
Cypress to test the side effect of a successful request (the display of the
Book results), you can test the actual cause of the results.
cy.intercept('/search*', [{ item: 'Book 1' }, { item: 'Book 2' }]).as(
  'getSearch'
)

// our autocomplete field is throttled
// meaning it only makes a request after
// 500ms from the last keyPress
cy.get('[data-testid="autocomplete"]').type('Book')

// wait for the request + response
// thus insulating us from the
// throttled request
cy.wait('@getSearch')

cy.get('[data-testid="results"]')
  .should('contain', 'Book 1')
  .and('contain', 'Book 2')
Real World Example
The Cypress Real World App (RWA) has various tests for testing an auto-complete field within a large user journey test that properly await requests triggered upon auto-complete input changes. Check out the example:
Failures
In our example above, we added an assertion to the display of the search results.
The search results working are coupled to a few things in our application:
- Our application making a request to the correct URL.
- Our application correctly processing the response.
- Our application inserting the results into the DOM.
In this example, there are many possible sources of failure. In most testing
tools, if our request failed to go out, we would normally only ever get an error
once we attempt to find the results in the DOM and see that there is no matching
element. This is problematic because it's unknown why the results failed to be
displayed. Was there a problem with our rendering code? Did we modify or change
an attribute such as an id or class on an element? Perhaps our server sent
us different Book items.
With Cypress, by adding a cy.wait(), you can more easily
pinpoint your specific problem. If the response never came back, you'll receive
an error like this:
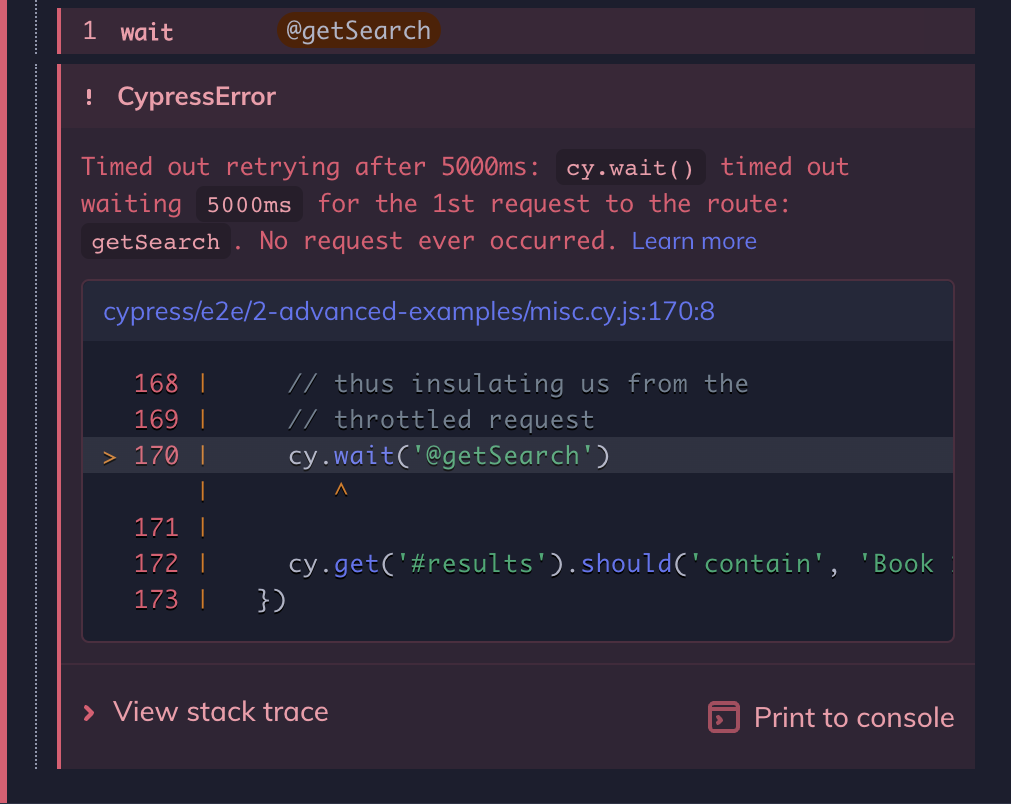
Now we know exactly why our test failed. It had nothing to do with the DOM. Instead we can see that either our request never went out or a request went out to the wrong URL.
Assertions
Another benefit of using cy.wait() on requests is that
it allows you to access the actual request object. This is useful when you want
to make assertions about this object.
In our example above we can assert about the request object to verify that it sent data as a query string in the URL. Although we're mocking the response, we can still verify that our application sends the correct request.
// any request to "/search/*" endpoint will
// automatically receive an array with two book objects
cy.intercept('/search/*', [{ item: 'Book 1' }, { item: 'Book 2' }]).as(
  'getSearch'
)

cy.get('[data-testid="autocomplete"]').type('Book')

// this yields us the interception cycle object
// which includes fields for the request and response
cy.wait('@getSearch').its('request.url').should('include', '/search?query=Book')

cy.get('[data-testid="results"]')
  .should('contain', 'Book 1')
  .and('contain', 'Book 2')
The interception object that cy.wait() yields you has
everything you need to make assertions including:
- URL
- Method
- Status Code
- Request Body
- Request Headers
- Response Body
- Response Headers
Examples
// spy on POST requests to /users endpoint
cy.intercept('POST', '/users').as('new-user')

// trigger network calls by manipulating web app's
// user interface, then
cy.wait('@new-user').should('have.property', 'response.statusCode', 201)

// we can grab the completed interception object
// again to run more assertions using cy.get(<alias>)
cy.get('@new-user') // yields the same interception object
  .its('request.body')
  .should(
    'deep.equal',
    JSON.stringify({
      id: '101',
      firstName: 'Joe',
      lastName: 'Black',
    })
  )

// and we can place multiple assertions in a
// single "should" callback
cy.get('@new-user').should(({ request, response }) => {
  expect(request.url).to.match(/\/users$/)
  expect(request.method).to.equal('POST')
  // it is a good practice to add assertion messages
  // as the 2nd argument to expect()
  expect(response.headers, 'response headers').to.include({
    'cache-control': 'no-cache',
    expires: '-1',
    'content-type': 'application/json; charset=utf-8',
    location: '<domain>/users/101',
  })
})
Tip: you can inspect the full request cycle object by logging it to the console
cy.wait('@new-user').then(console.log)
Working with WebSockets
Cypress transparently proxies WebSocket connections, so your application's WebSocket traffic will work as expected during tests.
Limitations
Stubbing or mocking individual WebSocket messages/frames is not natively
supported by cy.intercept(). If your application relies on receiving specific
WebSocket messages during a test, consider the following strategies:
-
Stub application callbacks directly — Use
cy.stub()to intercept the handlers your application registers (e.g.onmessage) and call them with the payload you want to simulate. -
Control messages from your server — Have your server send the desired messages in response to actions your test triggers (e.g. a
cy.request()to a test-only endpoint). -
Use a helper WebSocket client — Run a small Node.js server outside the browser that connects to your application's WebSocket server and exposes a REST API that your Cypress tests can call with
cy.request().
See the Multiple browsers open at the same time section of the Trade-offs guide for detailed examples of these patterns.
Working with GraphQL
The strategies below follow best known practices for waiting and asserting against GraphQL queries or mutations.
Waiting and asserting on GraphQL API requests rely on matching a query or mutation name in the POST body.
Using cy.intercept() we can override the response to a GraphQL query or mutation by declaring an intercept at the beginning of the test or closer to the expectation.
Alias multiple queries or mutations
In the beforeEach, we will use cy.intercept() to
capture all requests for a GraphQL endpoint (e.g. /graphql), use conditionals
to match the query or mutation and set an alias for using req.alias.
First, we'll create a set of utility functions to help match and alias our queries and mutations.
// utils/graphql-test-utils.js

// Utility to match GraphQL mutation based on the operation name
export const hasOperationName = (req, operationName) => {
  const { body } = req
  return (
    Object.prototype.hasOwnProperty.call(body, 'operationName') &&
    body.operationName === operationName
  )
}

// Alias query if operationName matches
export const aliasQuery = (req, operationName) => {
  if (hasOperationName(req, operationName)) {
    req.alias = `gql${operationName}Query`
  }
}

// Alias mutation if operationName matches
export const aliasMutation = (req, operationName) => {
  if (hasOperationName(req, operationName)) {
    req.alias = `gql${operationName}Mutation`
  }
}
In our test file, we can import these utilities and use them to alias the
queries and mutations for our tests in a beforeEach.
// app.cy.js
import { aliasQuery, aliasMutation } from '../utils/graphql-test-utils'

context('Tests', () => {
  beforeEach(() => {
    cy.intercept('POST', 'http://localhost:3000/graphql', (req) => {
      // Queries
      aliasQuery(req, 'GetLaunchList')
      aliasQuery(req, 'LaunchDetails')
      aliasQuery(req, 'GetMyTrips')

      // Mutations
      aliasMutation(req, 'Login')
      aliasMutation(req, 'BookTrips')
    })
  })
  // ...
})
Expectations for Query or Mutation Results
Expectations can be made against the response of an intercepted GraphQL query or mutation using cy.wait().
// app.cy.js
import { aliasQuery } from '../utils/graphql-test-utils'

context('Tests', () => {
  beforeEach(() => {
    cy.intercept('POST', 'http://localhost:3000/graphql', (req) => {
      // Queries
      aliasQuery(req, 'Login')

      // ...
    })
  })

  it('should verify login data', () => {
    cy.wait('@gqlLoginQuery')
      .its('response.body.data.login')
      .should('have.property', 'id')
      .and('have.property', 'token')
  })
})
Modifying a Query or Mutation Response
In the test below, the response is modified to test the UI for a single page of results.
// app.cy.js
import { hasOperationName, aliasQuery } from '../utils/graphql-test-utils'

context('Tests', () => {
  beforeEach(() => {
    cy.intercept('POST', 'http://localhost:3000/graphql', (req) => {
      // Queries
      aliasQuery(req, 'GetLaunchList')

      // ...
    })
  })

  it('should not display the load more button on the launches page', () => {
    cy.intercept('POST', 'http://localhost:3000/graphql', (req) => {
      if (hasOperationName(req, 'GetLaunchList')) {
        // Declare the alias from the initial intercept in the beforeEach
        req.alias = 'gqlGetLaunchListQuery'

        // Set req.fixture or use req.reply to modify portions of the response
        req.reply((res) => {
          // Modify the response body directly
          res.body.data.launches.hasMore = false
          res.body.data.launches.launches =
            res.body.data.launches.launches.slice(5)
        })
      }
    })

    // Must visit after cy.intercept
    cy.visit('/')

    cy.wait('@gqlGetLaunchListQuery')
      .its('response.body.data.launches')
      .should((launches) => {
        expect(launches.hasMore).to.be.false
        expect(launches.length).to.be.lte(20)
      })

    cy.get('#launch-list').its('length').should('be.gte', 1).and('be.lt', 20)
    cy.contains('button', 'Load More').should('not.exist')
  })
})
Command Log
By default, Cypress logs all XMLHttpRequests and fetches made by the
application under test in the Command Log. Here is an example of what this looks
like:

Note: Logging can be disabled by passing { log: false } with the static
response.
cy.intercept('/users*', { body: ['user1', 'user2'], log: false }).as('getUsers')
To disable logs for all xhr/fetch requests, checkout our example on the intercept api page.
The circular indicator on the left side indicates if the request went to the
destination server or not. If the circle is solid, the request went to the
destination server; if it is outlined, the response was stubbed by
cy.intercept() and not sent outbound.
If we re-run our previous test to make the same requests, but this time, add a
cy.intercept() to stub the response to /users, we can see that the indicator
changes. After adding the following line:
cy.intercept('/users*', ['user1', 'user2']).as('getUsers')
The Command Log will look like this:

The fetch request now has an open circle, to indicate that it has been
stubbed. Also, note that the alias for the cy.intercept() is now displayed on
the right-hand side of the Command Log. If you mouse over the alias, you can see
more information about how the request was handled:

Additionally, the request will be flagged if the request and/or response was
modified by a cy.intercept() handler function. If we add this code to modify
outgoing requests to /users:
cy.intercept('/users*', (req) => {
  req.headers['authorization'] = 'bearer my-bearer-auth-token'
}).as('addAuthHeader')
The request log for /users will reflect that the req object was modified,
but the request was still fulfilled from the destination (filled indicator):

As you can see, "req modified" is displayed in the badge, to indicate the
request object was modified. "res modified" and "req + res modified" can also be
displayed, depending on if res was modified inside of a req.continue()
callback.
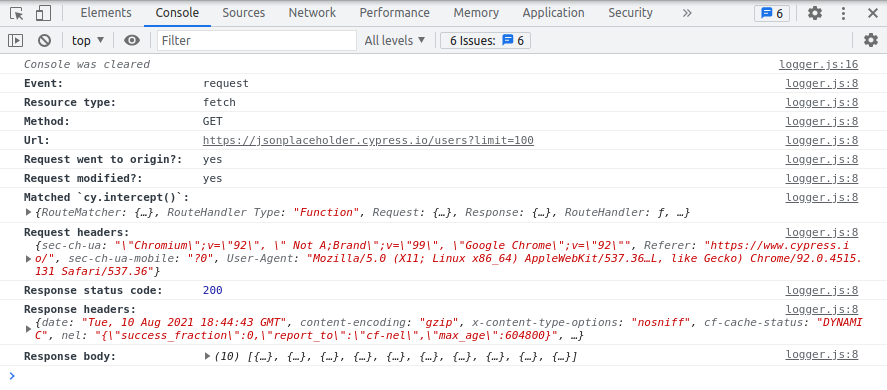
As with all command logs, logs for network requests can be clicked to display
additional information in the Console. For example, after clicking the previous
request for /users?limit=100 and opening Developer Tools, we can see the
following:
See also
cy.intercept()docs- Network requests in Kitchen Sink example
- See how to make a request with
cy.request() - Real World App (RWA) test suites to see Cypress network handling in action.
- Read the blog post Asserting Network Calls from Cypress Tests
- If you want to test the application in offline mode, read Testing an Application in Offline Network Mode