Projects
What you'll learn
- How to set up a project to record test runs
- How to manage project settings
- How to transfer ownership of a project
- Best practices for multi-repo implementation
- How to integrate with source control providers, issue management, and team communication tools
Identification
Cypress uses your projectId and Record Key together to uniquely identify projects.
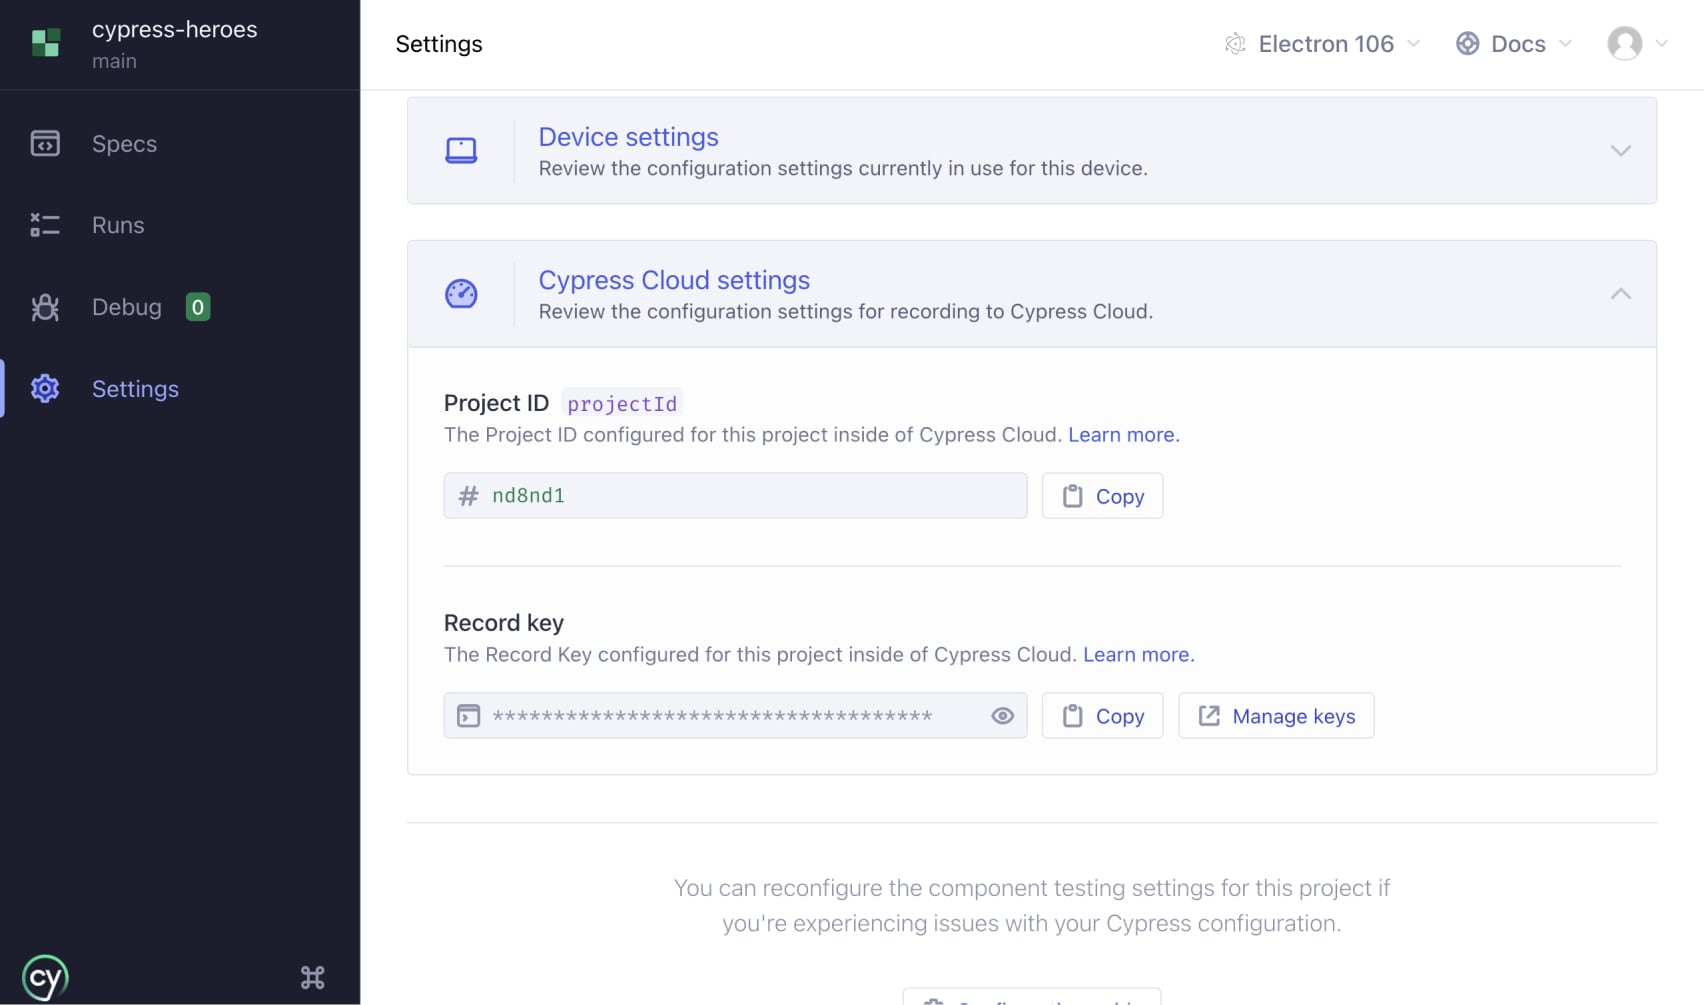
Project ID
Once you set up your project to record, we generate a unique projectId for
your project and automatically insert it into your Cypress configuration file.
The projectId is a 6 character string in your Cypress configuration
- cypress.config.js
- cypress.config.ts
const { defineConfig } = require('cypress')

module.exports = defineConfig({
  projectId: 'a7bq2k',
})
import { defineConfig } from 'cypress'

export default defineConfig({
  projectId: 'a7bq2k',
})
This helps us uniquely identify your project. If you manually alter this, Cypress will no longer be able to identify your project or find the recorded builds for it.
If you're using source control, we recommend that you check your Cypress
configuration file, including the projectId, into source control. If you don't
want your projectId visible in your source code you can set it as an
environment variable using the name CYPRESS_PROJECT_ID. The exact mechanism
for doing so depends on your system but could be something like:
export CYPRESS_PROJECT_ID={projectId}
Record key
The record key is used to authenticate that your project is allowed to record
tests to Cypress Cloud. As long as your record key stays private, no one will
be able to record test runs for your project - even if they have your
projectId.
Think of your record key as the key that enables you to write and create runs. However, it has nothing to do with being able to read or see runs once they are recorded.
Anyone that has access to both the projectId and the record key of a project
can record runs to that organization's project in Cypress Cloud.
You would not want people outside of your team running tests because:
- This could drive up the number of tests you've run. Since Cypress bills based on the number of recorded tests - this means they can use up all allotted tests and there would be consequences to that.
- They can write any data they want to your Cypress Cloud. They could edit the test suite so that recorded tests record different things than the project's original intent. This could including visiting different websites and generating videos of visiting those websites, for example.
If a record key is exposed you should delete it and create a new record key. Deleted keys will be invalid; If a project is run with a deleted key it will not be able to record.
You can set your record key as an environment variable to help protect it. Learn more here.
Once you're set up to record test runs, we automatically generate a Record Key for the project.
A record key is a GUID that looks like this
f4466038-70c2-4688-9ed9-106bf013cd73
You can create multiple Record Keys for a project, or delete existing ones from Cypress Cloud.

You can also find your Record Key inside of the Settings tab in the Cypress App.
Create new record key
- Go to your organization's projects page.
- Select the project you want to change access to.
- Go to the project's Settings page.
- Here you will see a Record Keys section
- Click Create New Key. A new key will be automatically generated for your project.
Delete record key
- Go to your organization's projects page.
- Select the project you want to change access to.
- Go to the project's Settings page.
- Here you will see a Record Keys section
- Click Delete beside the record key you want to delete.
Project settings
Access to Runs
Visit your project settings to see who has access to your project's runs.
Public vs Private
-
Public means that anyone can see the recorded test runs for the project. It is similar to how public projects on GitHub, Travis CI, or CircleCI are handled. Anyone who knows your
projectIdwill be able to see the recorded runs for public projects. -
Private means that only users you invite to your organization can see its recorded runs. Even if someone knows your
projectId, they will not have access to your runs unless you have invited them.
Change project access
- Go to your organization's projects page.
- Select the project you want to change access to.
- Go to the project's Settings page.
- Here you will see a section displaying Access. Choose the appropriate
access you'd like to assign.

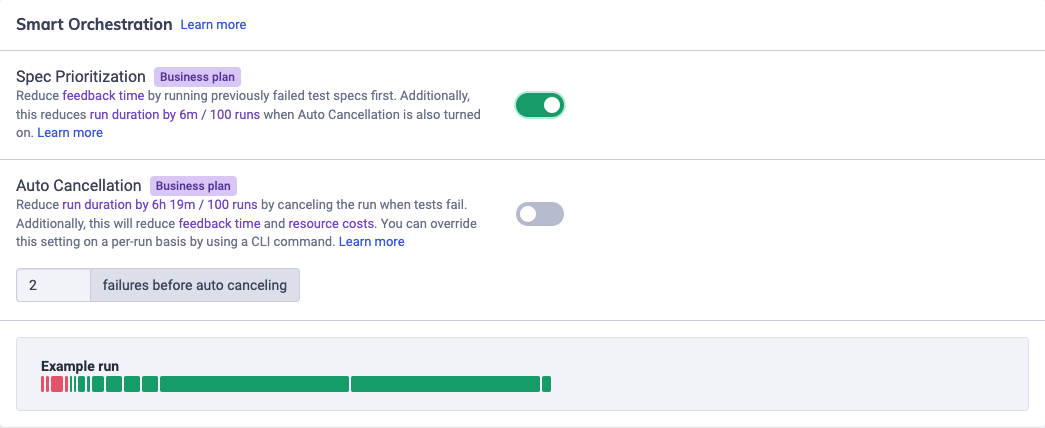
Smart Orchestration
Spec Prioritization & Auto Cancellation
Toggle Spec Prioritization to reduce feedback time by running previously failed test specs first. Enabling Auto Cancellation to reduce run duration by canceling the run when tests fail. Adjust the number of test failures before auto canceling.
These settings can significantly improve developer resolution time, reduce your monthly CI bill and free up CI resources. See our Spec Prioritization and Auto Cancellation guides to learn more.
Parallelization
Run completion delay
Control how long the Cypress Cloud should wait for new groups to join a run before transitioning a run to a completed status with the Run completion delay . This gives your test groups a grace period to join an existing run before the run is considered complete.
Use run completion delay when you have a distributed test setup where test groups might not all start simultaneously. For example:
- CI jobs that might start at slightly different times
- Parallelization across multiple machines
- Flaky network conditions that might delay some test groups from connecting
The default is 60 seconds. Increasing this value gives your test groups more time to join the run; decreasing it will make runs complete faster when no new groups are joining.
See our Parallelization guide to learn more.

Run Timeout
Run timeout is the number of minutes that Cypress Cloud will wait to receive a signal from a run before marking the spec and run as Timed Out. This is the maximum time Cypress Cloud will wait for activity from your tests before considering them hung or failed.
Use run timeout when you have long-running tests that might exceed the default. For example:
- Very long-running end-to-end tests
- Tests that include operations that take significant time (such as large file uploads)
- Operations with unpredictable completion times
The default is 90 minutes. You can shorten this for faster feedback when a run has stopped sending data.

Run completion delay vs. Run timeout
These settings work together to balance giving your tests enough time to complete while not waiting indefinitely for runs that have failed or hung:
- Run completion delay (seconds): How long to wait for new test groups to join after all currently known groups complete. Applies only during that waiting period.
- Run timeout (minutes): How long to wait for any activity from a run before marking it timed out. Applies throughout the entire run.
Transfer ownership
Transfer project to other user or organization
You can transfer projects that you own to another organization you are a part of or to another user in the organization. Projects can only be transferred from Cypress Cloud.
- Select your organization in the organization switcher.
- Select the project you wish to transfer.
- Go to the project's Settings page.
- Scroll down to the Transfer Ownership section and click Transfer
Ownership.

- Select the user or organization, then click Transfer.
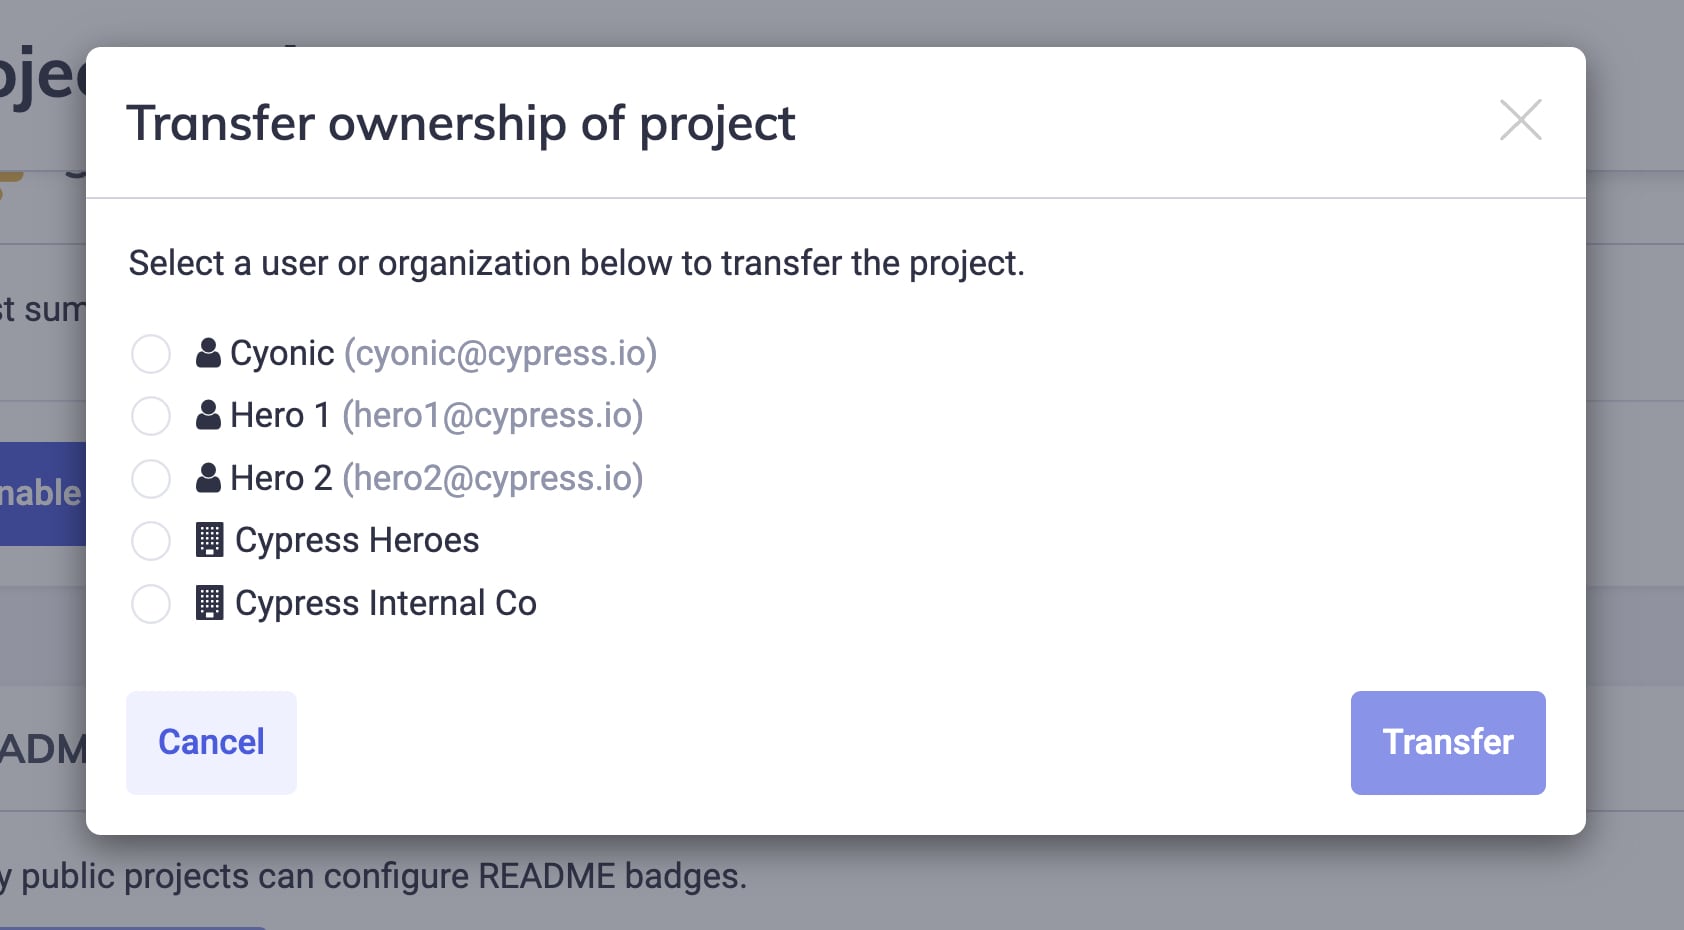
You are not allowed to transfer a project to an organization that is currently enrolled in a free trial.
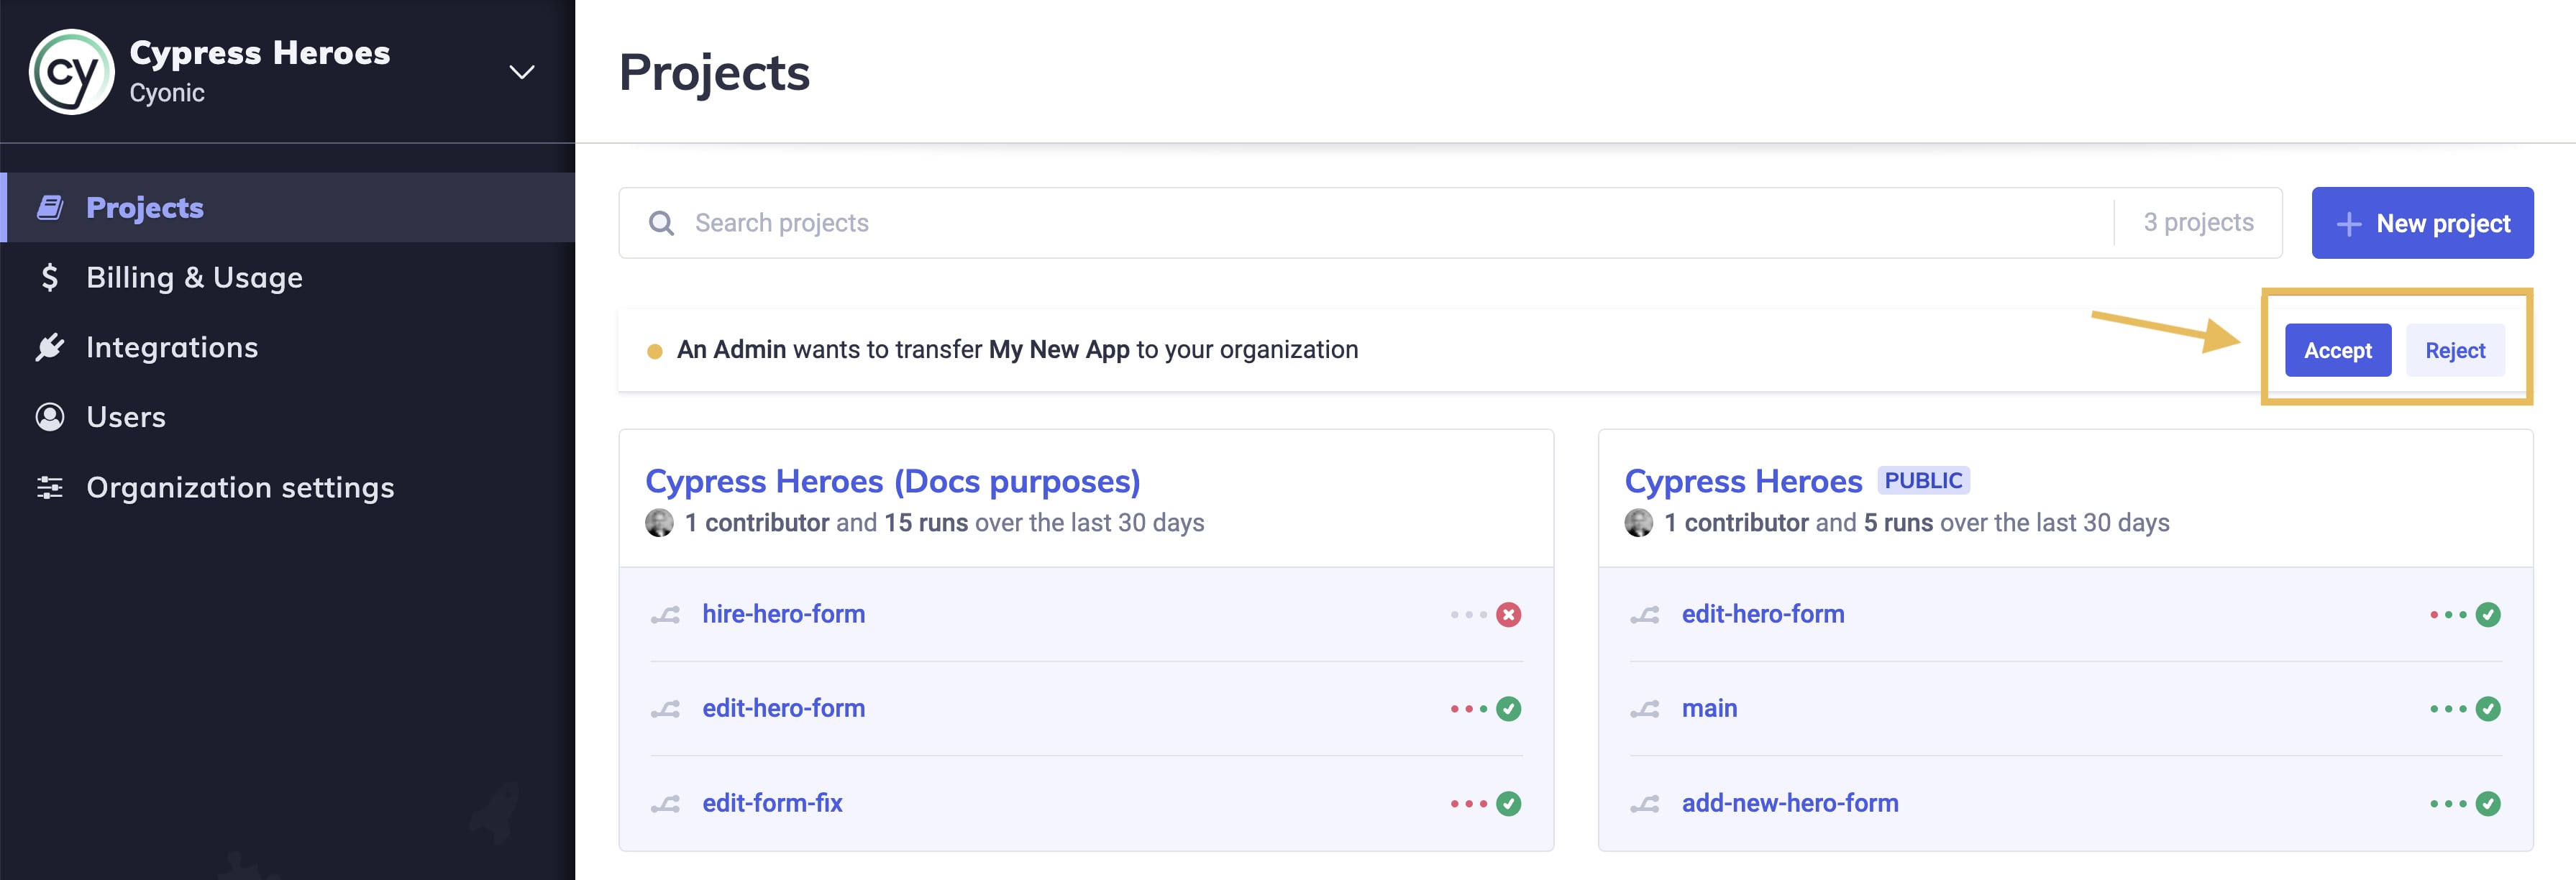
Cancel project transfer
Upon transferring, you can cancel the transfer at any time by visiting the organization's projects and clicking Cancel Transfer.

Accept or reject transferred project
When a project is transferred to you, you will receive an email notifying you. You will be able to accept or reject the transferred project by clicking the notification in the sidebar and clicking 'Accept' or 'Reject'.
Delete Project
You can delete projects you own. This will also delete all of their recorded test runs. Deleting projects can only be done from Cypress Cloud.
- Select your organization in the organization switcher.
- Select the project you want to remove.
- Go to the project's Settings page.
- At the very bottom of the Settings page click the Remove Project button.
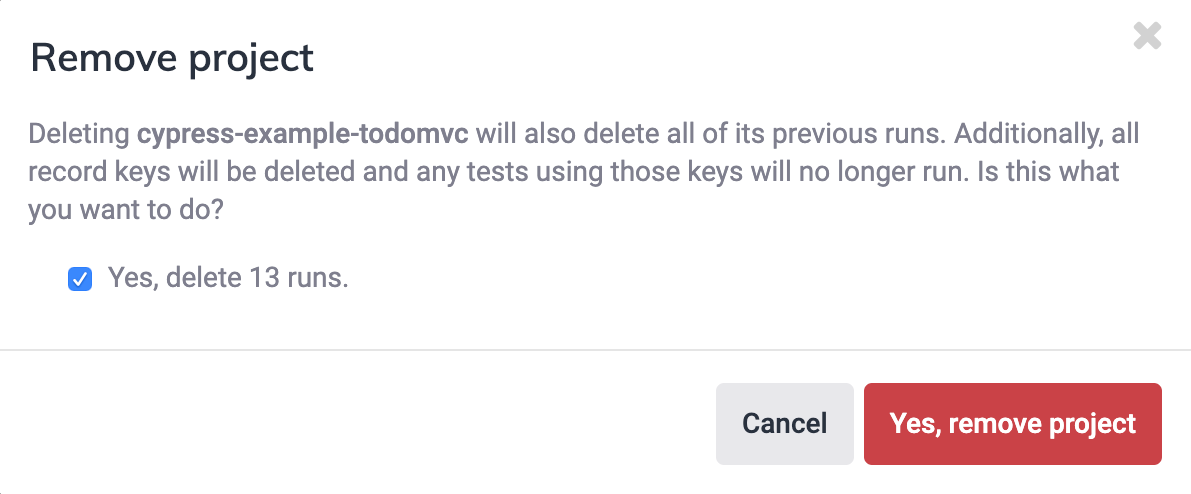
- Confirm that you want to delete the project by clicking Yes, Remove Project.
README Badges
README badges allow you to increase visibility of your project's test status and test count to other developers viewing your project's README file.
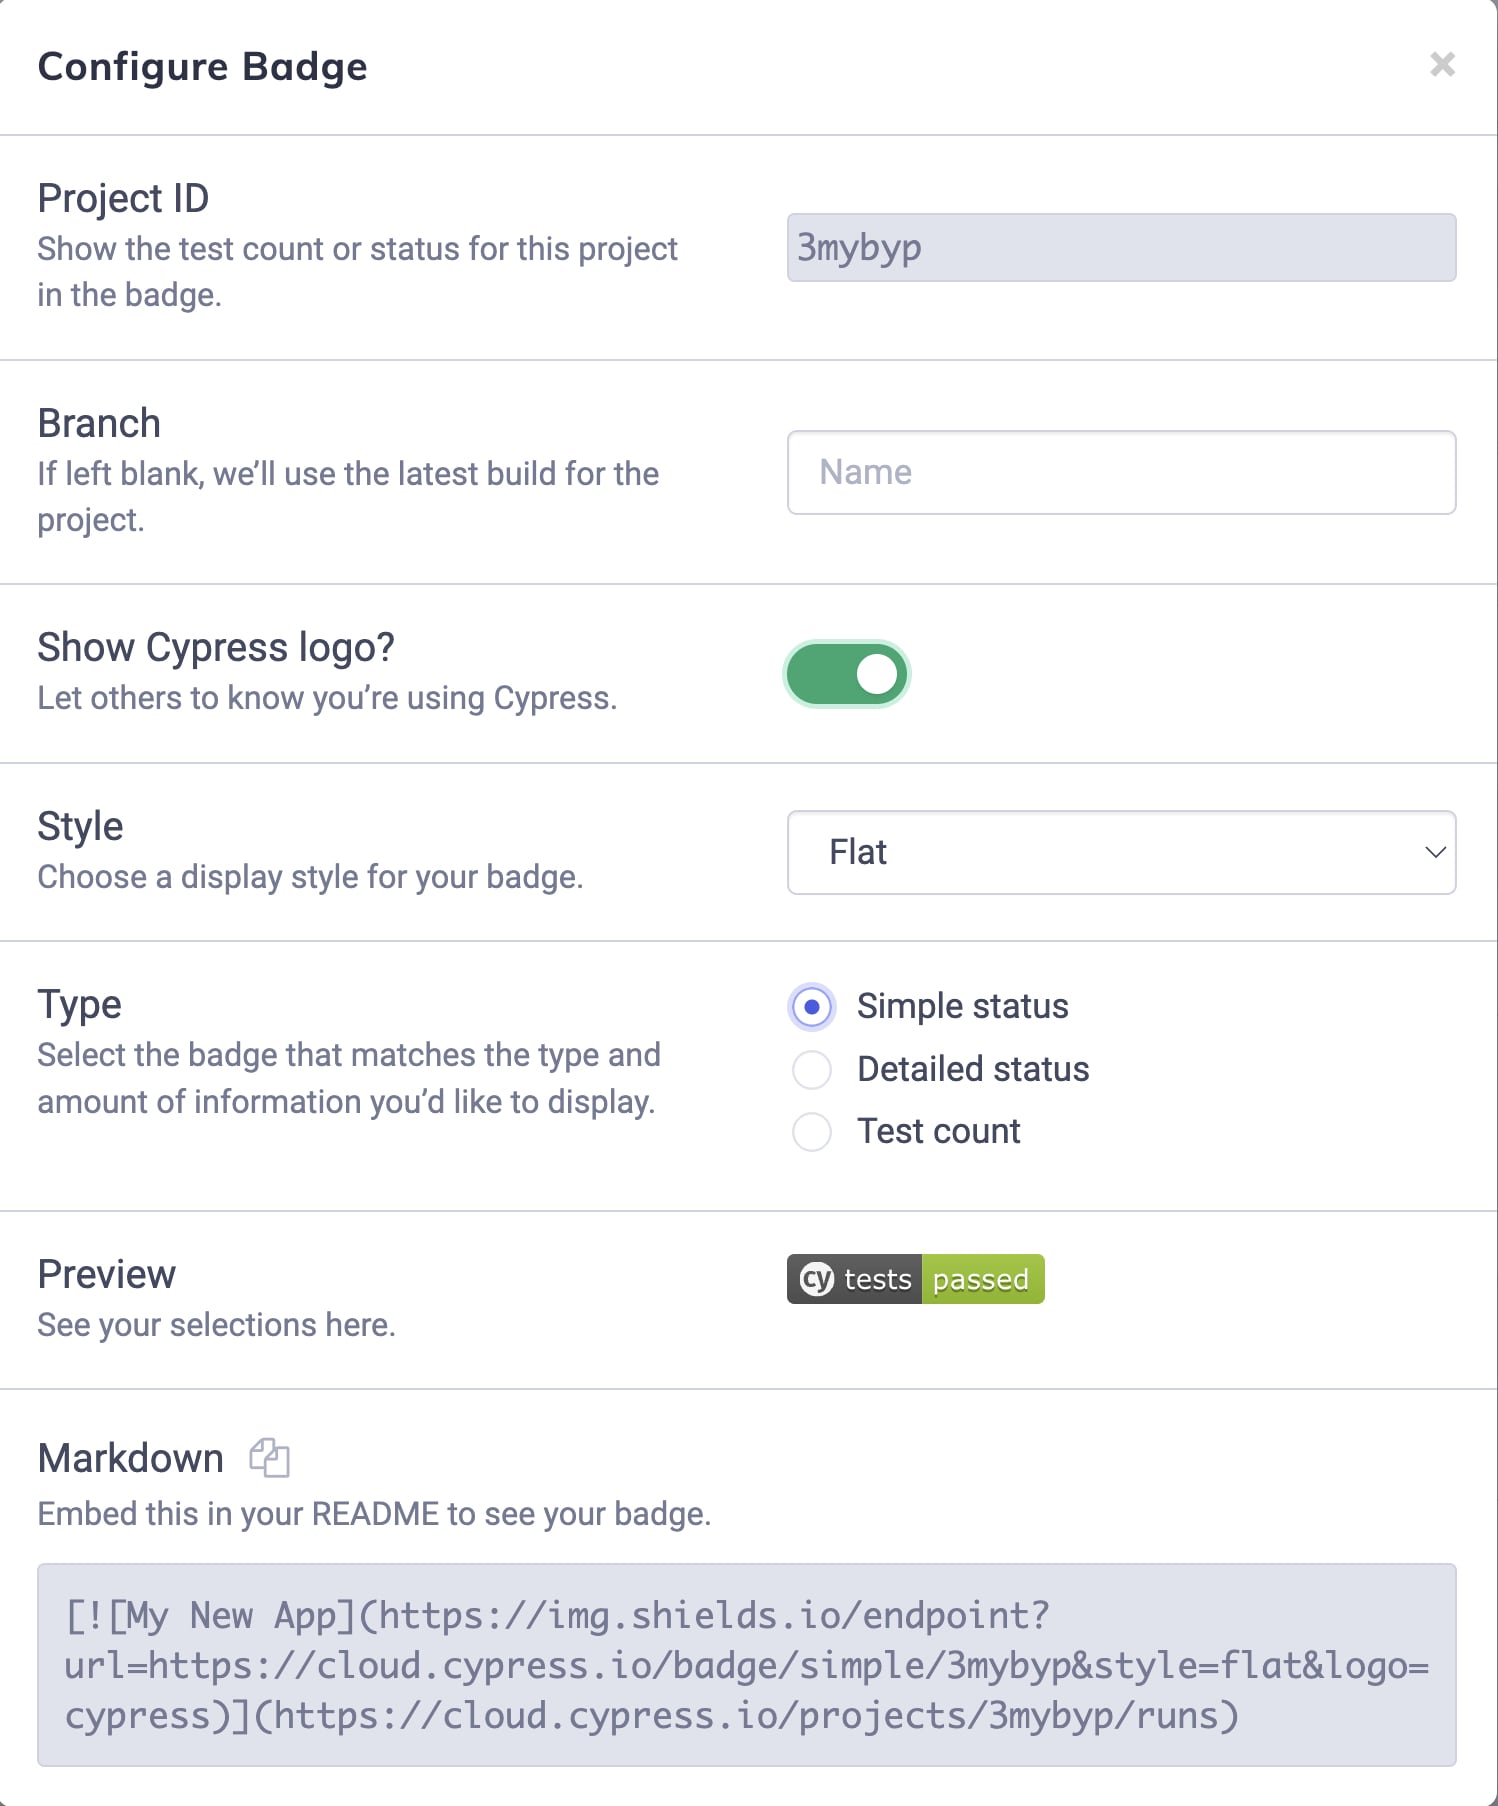
Create a README badge
- In your Cypress Cloud account, select the project for which you'd like to add a badge.
- On the Project Settings page, scroll down to the README Badges section and click “Configure Badge”.
Note: README badges are currently only available for public projects.
-
A configuration modal will appear. The Project ID will be pre-filled with the ID associated with the project you selected. You can choose to designate a specific branch, or leave this field blank to always use the latest build in the project.
-
Next, style your badge. Flat is the default styling and is most commonly used, but 5 style options are available.
-
Select the badge type to change the amount and type of information that's displayed. Simple status will show only whether tests are passing or failing. Detailed status will show the number of tests that were passed, failed, or skipped. Test count will show how many tests are included in your project.
-
Once you've selected all your settings, check out the preview and make sure everything looks just the way you like it.
-
🎉 Your badge is ready to be embedded. Copy the markdown at the bottom of the Configure Badge modal, and embed it in your project's README file for everyone to see!
See also Highlight your project's test status with Cypress README badges announcement.
Best Practices
Multi-repo Implementation
When Cypress tests reside in a repository separate from the application code, it creates a suboptimal Cloud experience - especially when considering the commit and branch interpretation for each git directory.
For any given Cypress project, all commits or branches associated to recorded runs should belong or relate to a single .git repository.
If this is not possible, there are some measures to help organize your data:
-
Create two separate projects in Cypress Cloud, for example, App Project and Test Project
-
For the App Project:
- Link the GitHub integration to the Application code repo
- Override the
COMMIT_INFO_*environment variables used by the test recording to reflect the state of the checked out Application code repo - Record any runs related to the Application code repo to App Project
- Capture any Cypress config/tests repo related identifiers (short sha/release number) as tags decorated on the run
-
For the Test Project:
- Link the GitHub integration to the Cypress config/tests repo
- Ensure any runs recorded to Test Project are related to test code changes in the Cypress config/tests repo
- The Application code repo state that the tests are executed against could likewise be captured as tags here, if necessary.
Third party integrations
You can integrate your project with many third party tools and edit those settings from within the project settings page.
See our integration guides to learn more: