Microsoft Teams Integration
What you'll learn
- How to enable the Cypress integration for Microsoft Teams
- How to configure Microsoft Teams notifications for your Cypress Cloud organization and projects
- How to customize message content and display
- How to filter notifications by tag, run group, or run status
- How to manage Microsoft Teams notifications at the organization and project level
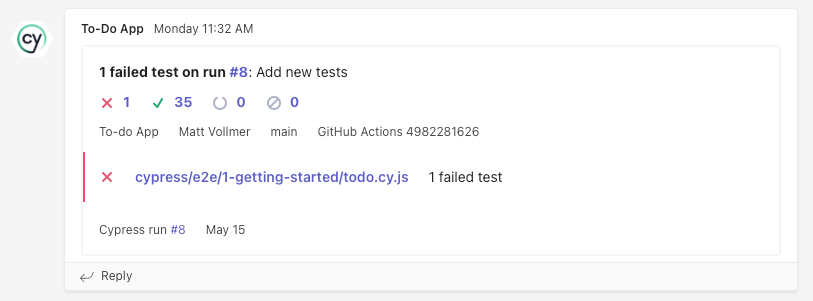
The Microsoft Teams integration allows you to see your Cypress test results directly in your Microsoft Teams channels.
Enable the Microsoft Teams integration
In order to enable the Cypress integration for Microsoft Teams, you must be an admin or owner of both your Cypress Cloud organization and your Microsoft Teams workspace.
Per-organization configuration (all projects)
-
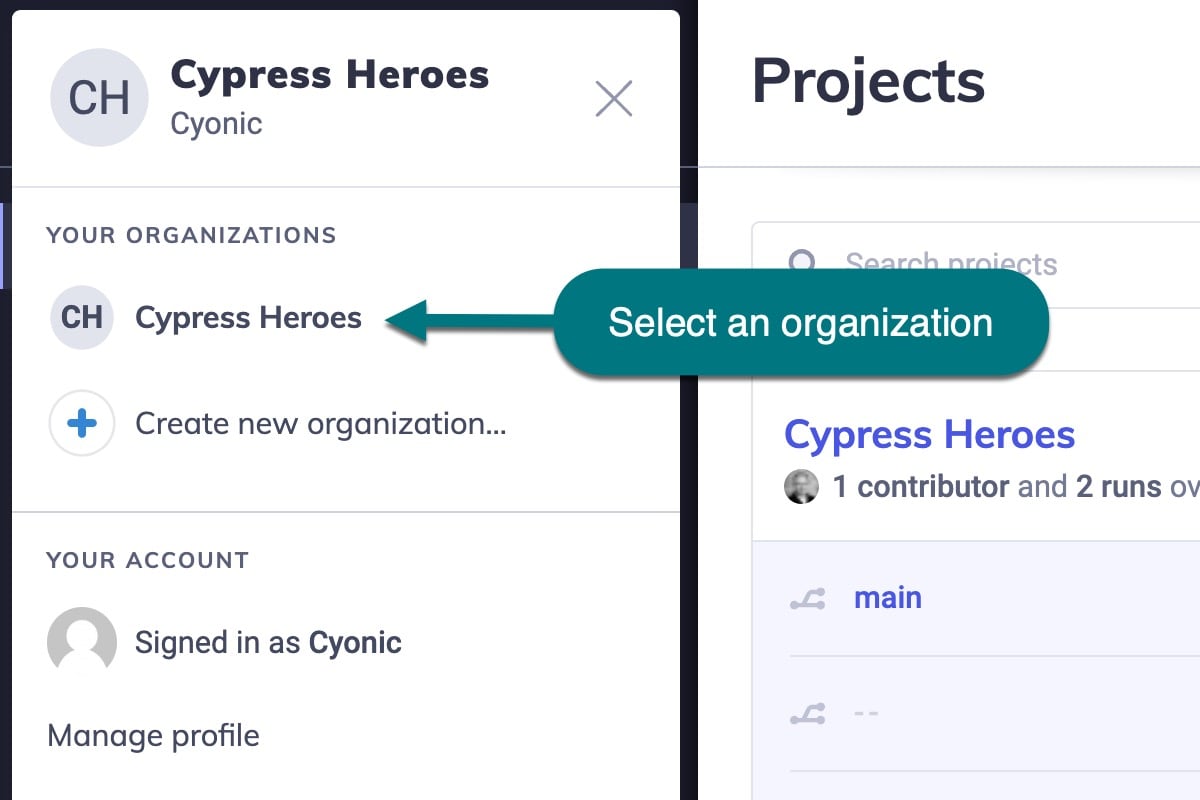
Go to Cypress Cloud Organizations page or open the organization switcher.
-
Select the organization you wish to integrate with Microsoft Teams.
-
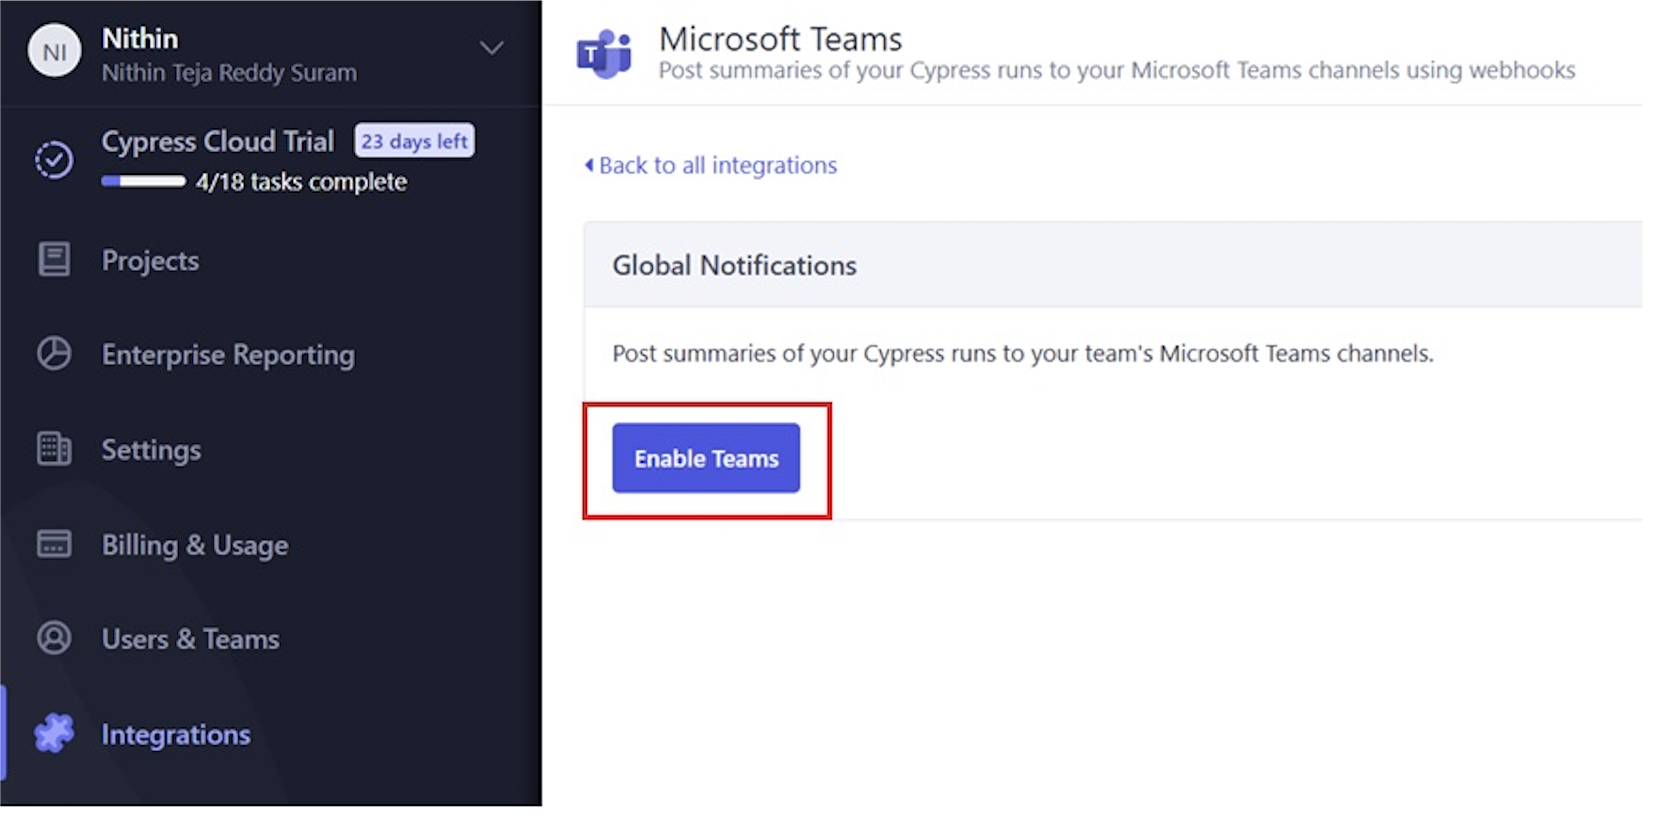
Visit the selected organization's Integrations page via the side navigation.

-
Click the Enable button in the Microsoft Teams section.

-
Click the Enable Teams button in the Microsoft Teams section under 'Global Notifications'.
-
You'll navigate to a window that manages webhooks as a way for Cypress Cloud to communicate with Microsoft Teams. First, you must configure an Incoming Webhook to a Teams channel.
In Microsoft Teams:
-
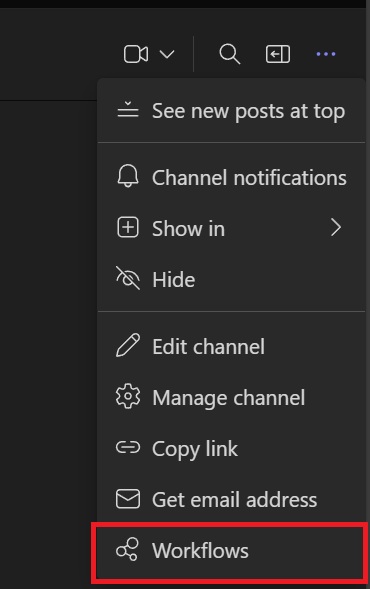
Open the channel in which you want to add the webhook and select ••• from the upper-right corner.
-
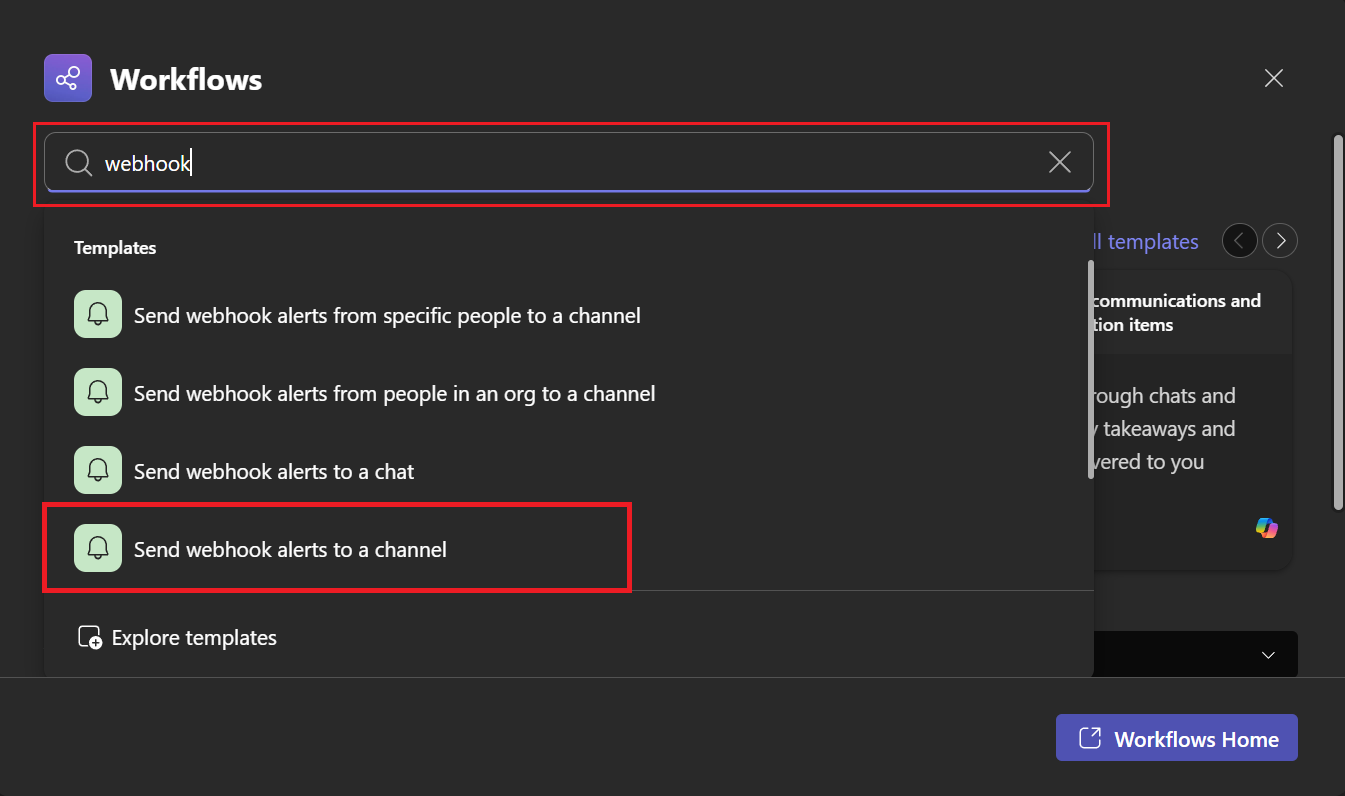
Select Workflows from the dropdown menu.
-
Search for webhooks and select select webhook alerts to channel.
-
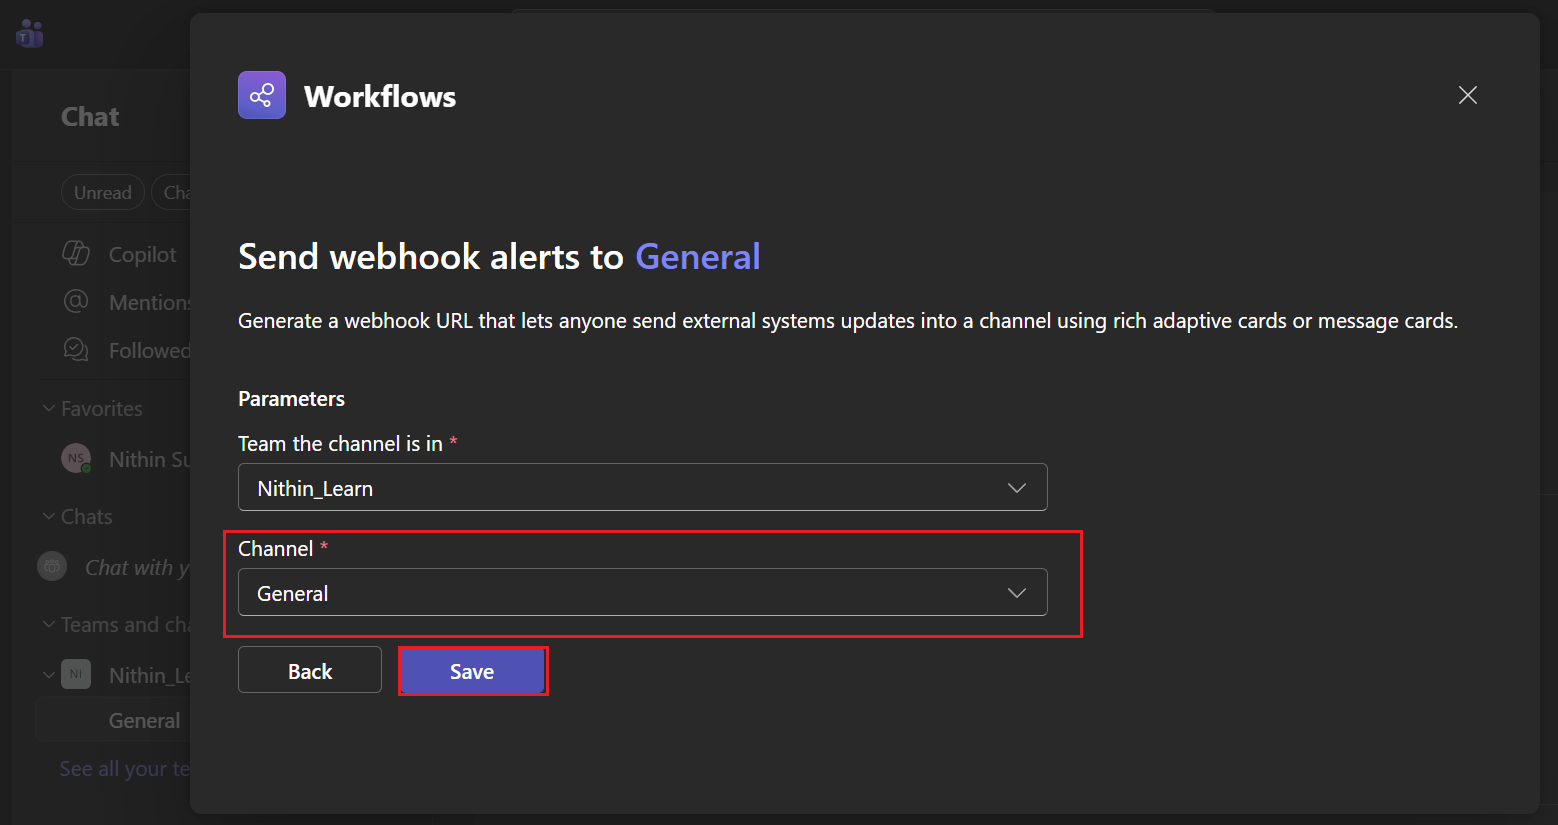
Select channel name from dropdown and click Save
-
Copy and save the unique webhook URL present in the dialog. The URL maps to the channel and you can use it to send information to Teams.
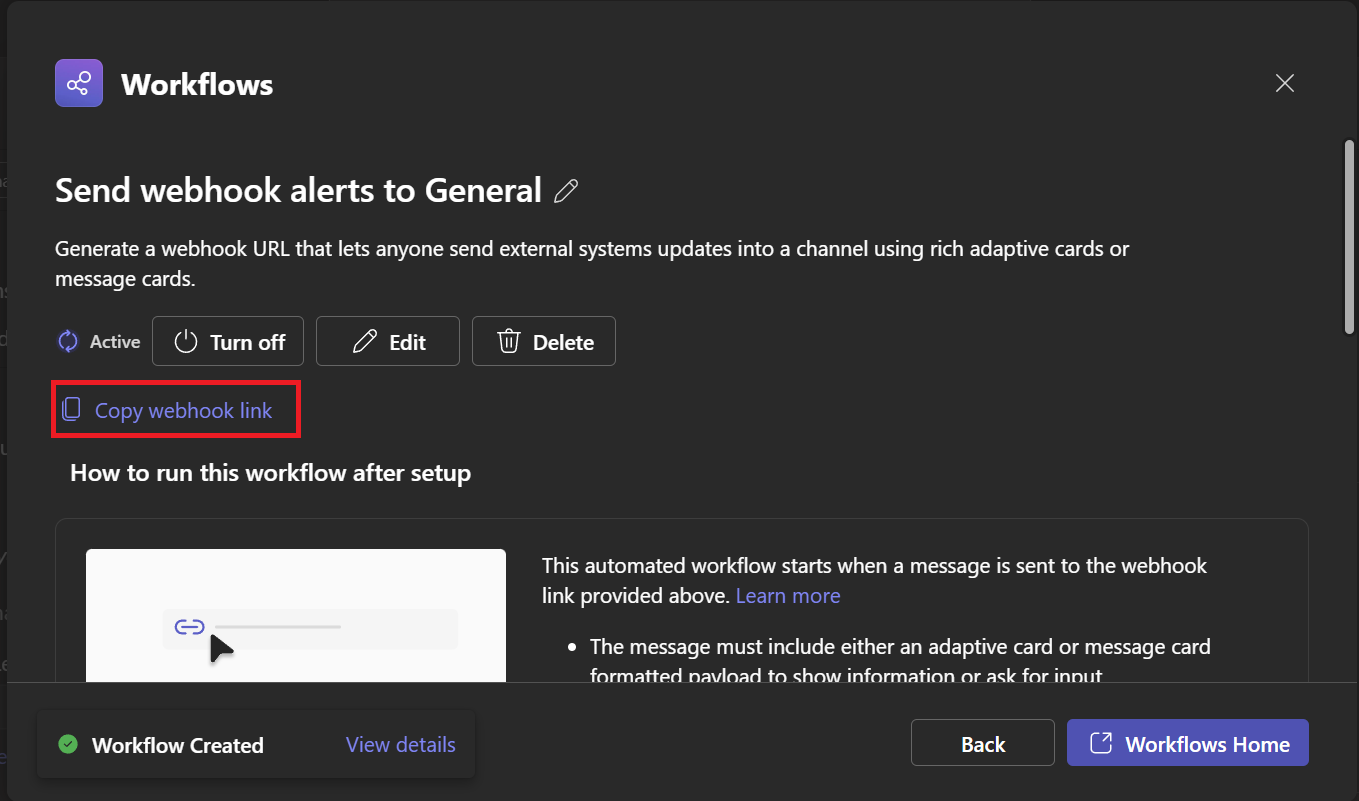
The webhook is now available in the Teams channel. For more information, see Microsoft Teams - Create Incoming Webhooks.
-
-
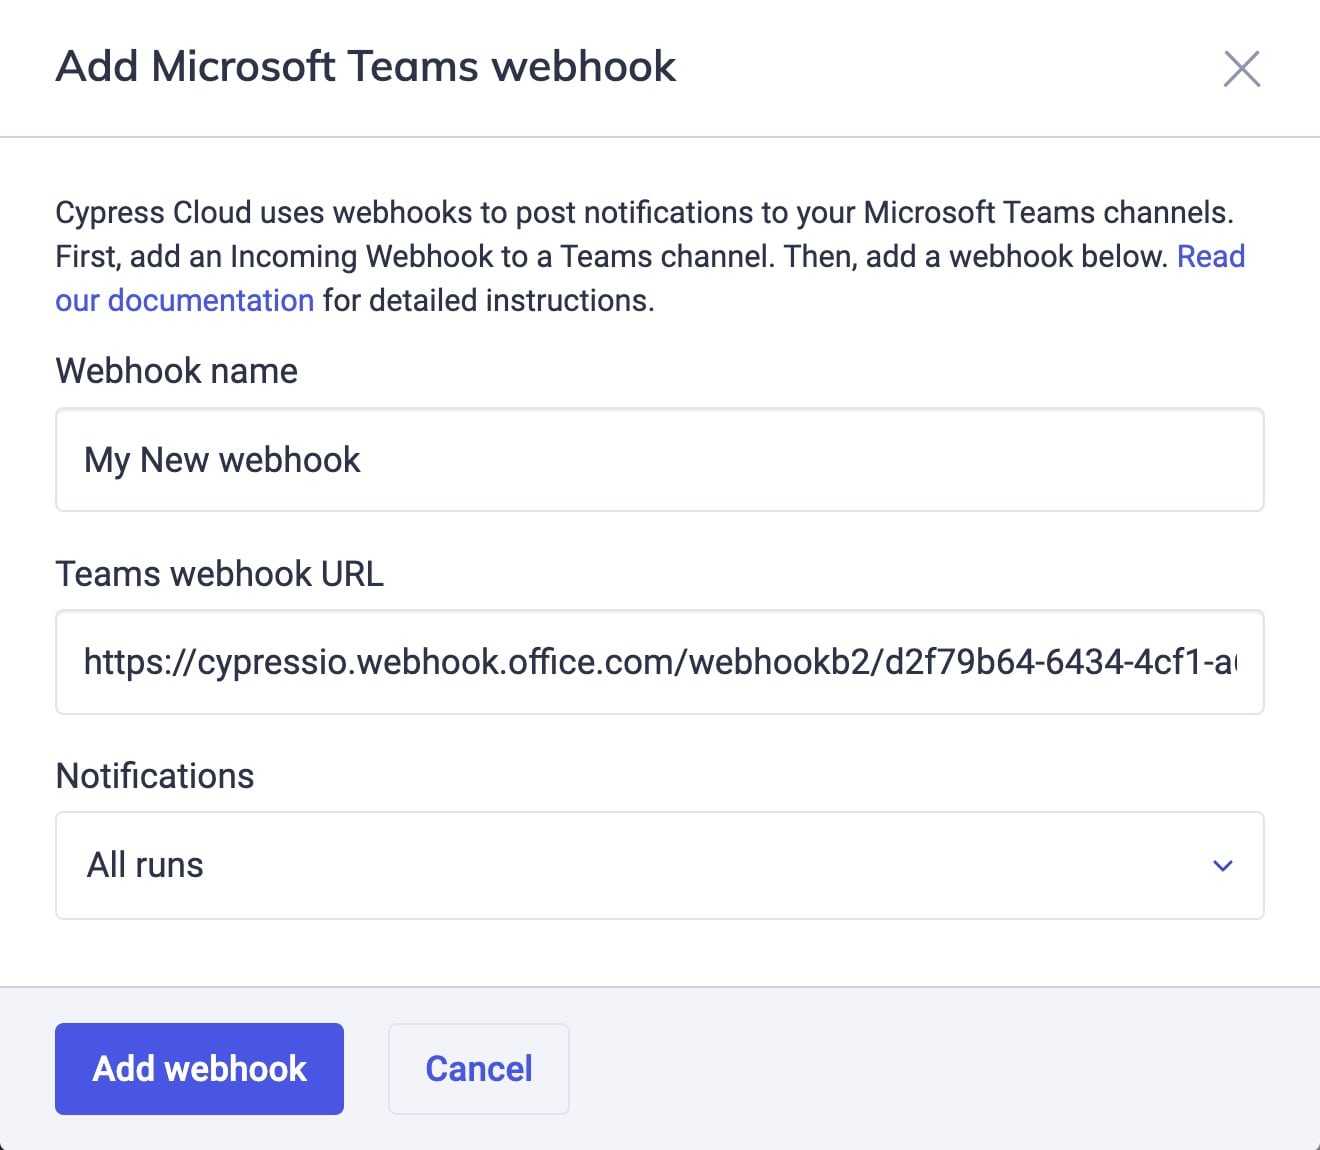
Then, add the Teams webhook to your Cypress Cloud Organization.
In Cypress Cloud:
-
Paste in the Teams webhook URL, choosing the types of notifications your team should receive.
Once you've configured and added your webhooks, the installation is complete! Cypress Cloud will post run results for all projects in your organization to the specified Microsoft Teams channel.
-
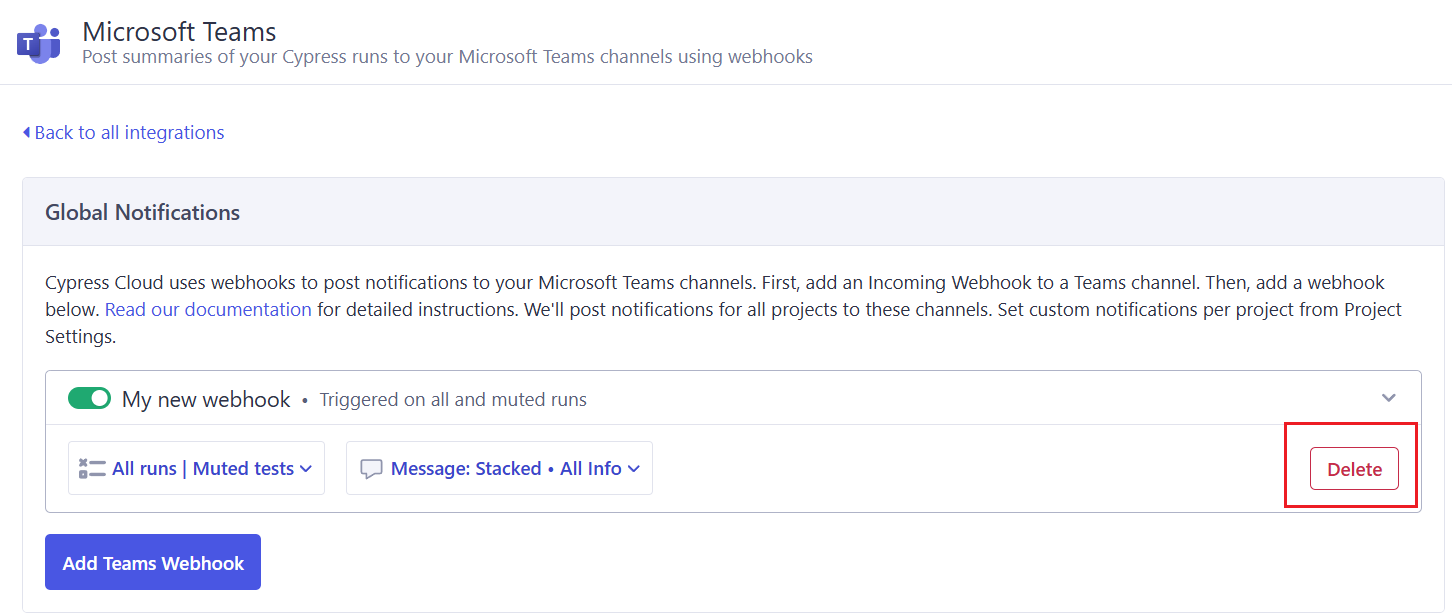
Remove a webhook
You can have Cypress Cloud stop posting notifications to a channel. You cannot delete the global notification channels from a project.
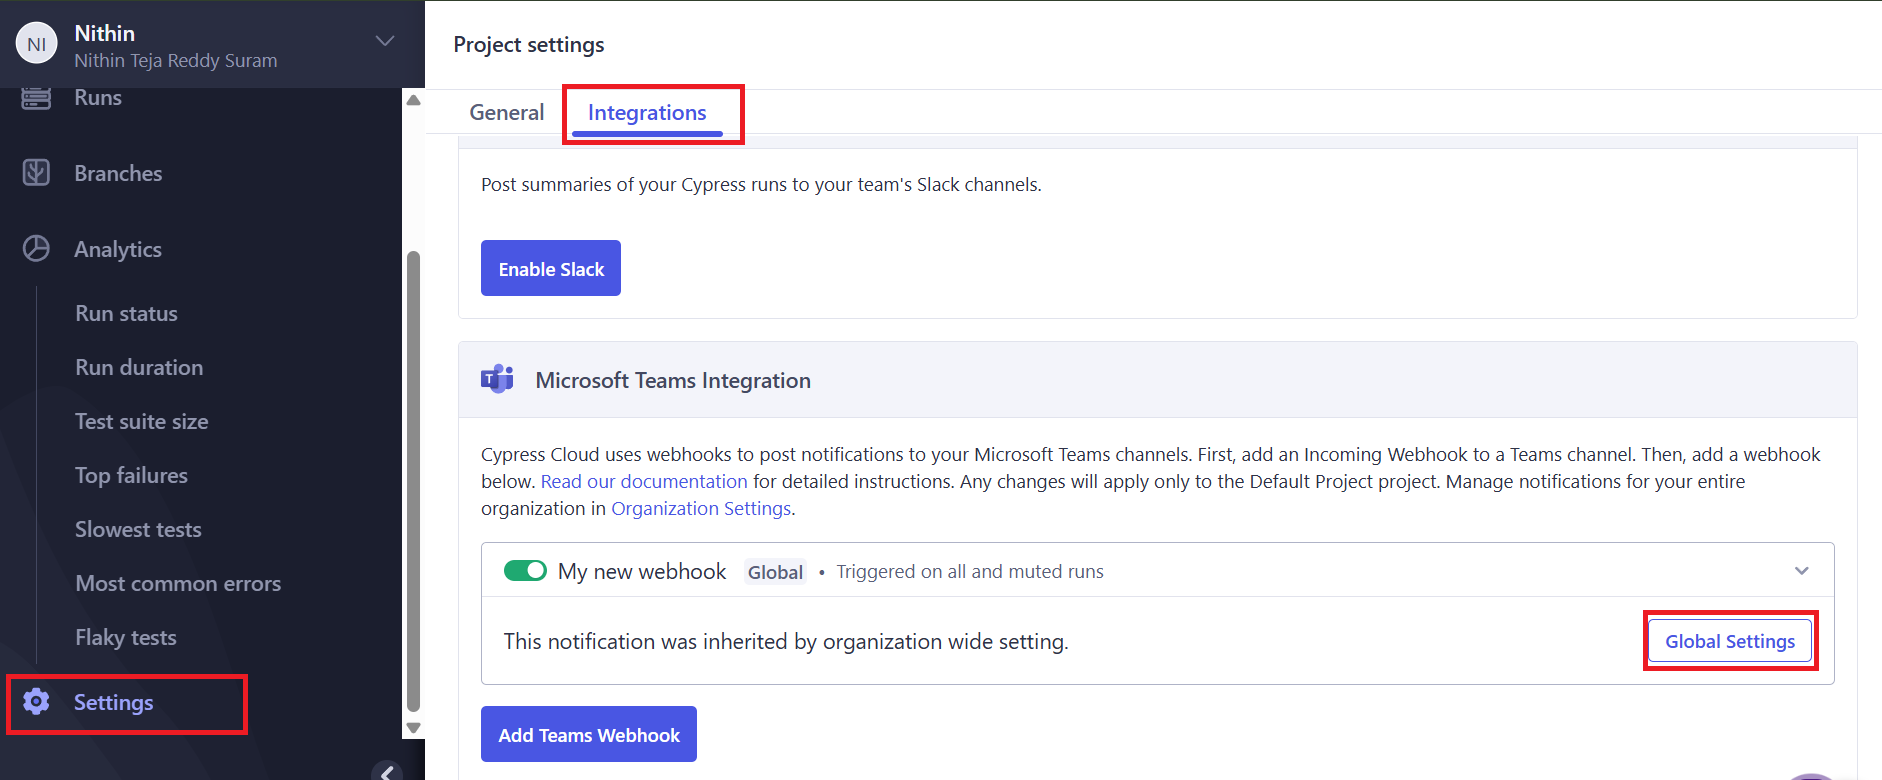
- Navigate to the Integrations page for the project with the installed integration.
- Scroll down to the Microsoft Teams Integration section.
- Select Global Settings then select Delete, you will get a prompt, click Yes, Delete
Per-project configuration
If your organization has multiple teams working on separate projects, you can tailor the Microsoft Teams notifications of each project to match your teams' needs. You can have Cypress Cloud post run results for a specific project.
-
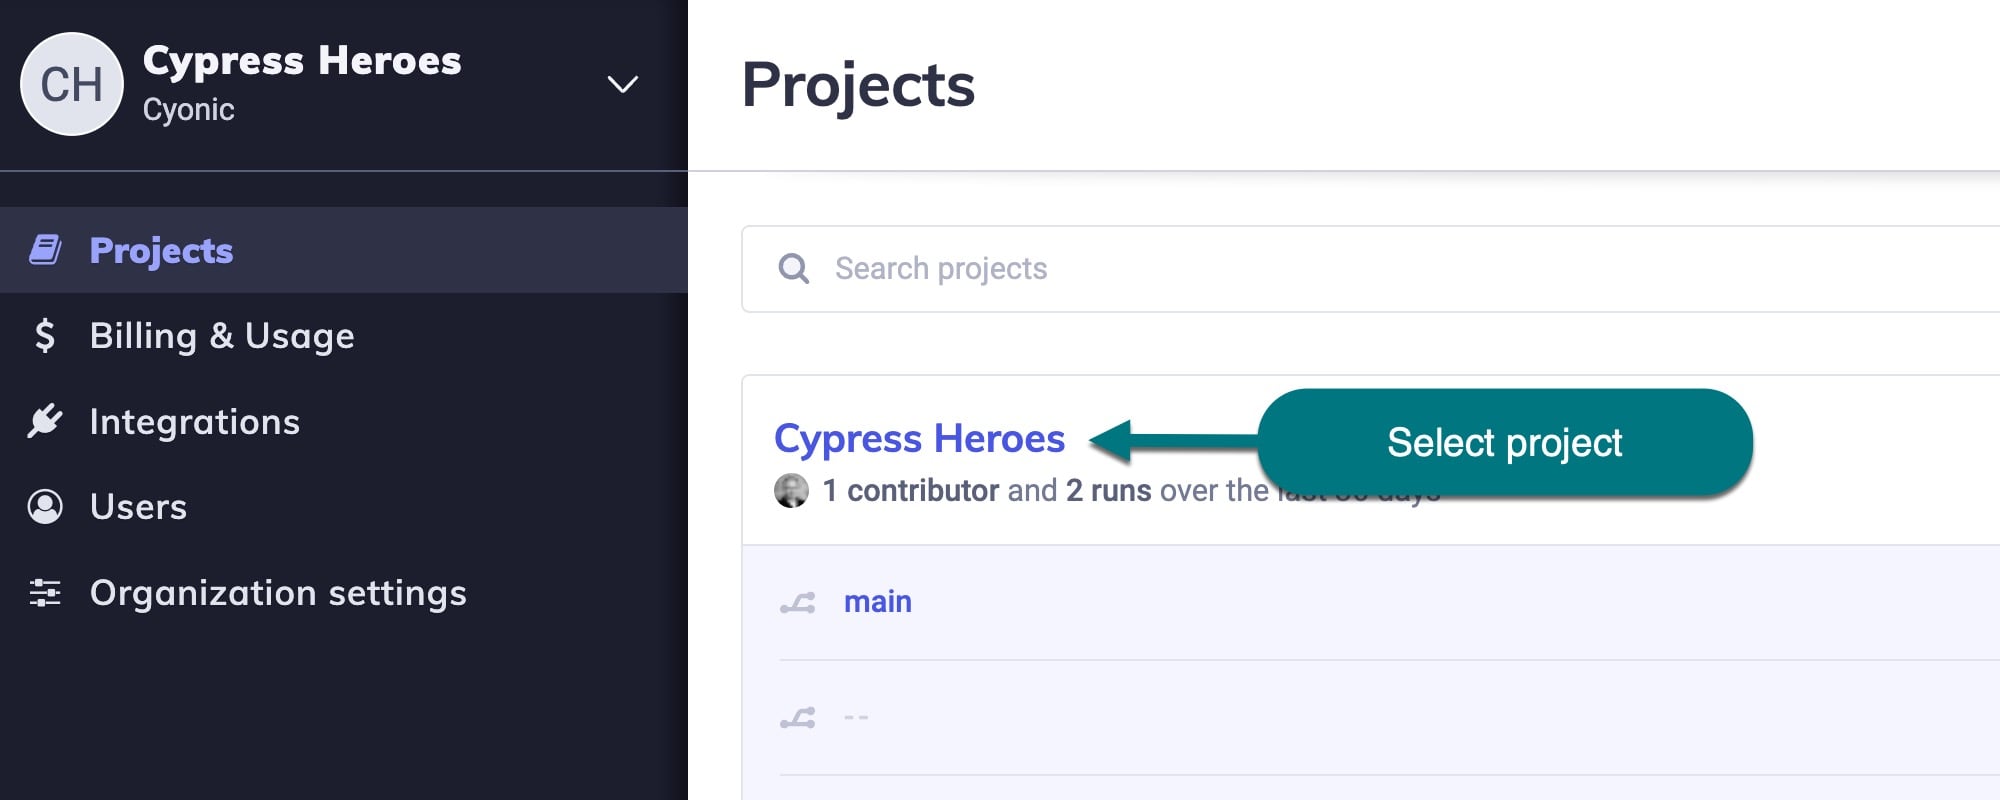
Select your organization in the organization switcher.
-
Select the project you wish to integrate with Microsoft Teams.
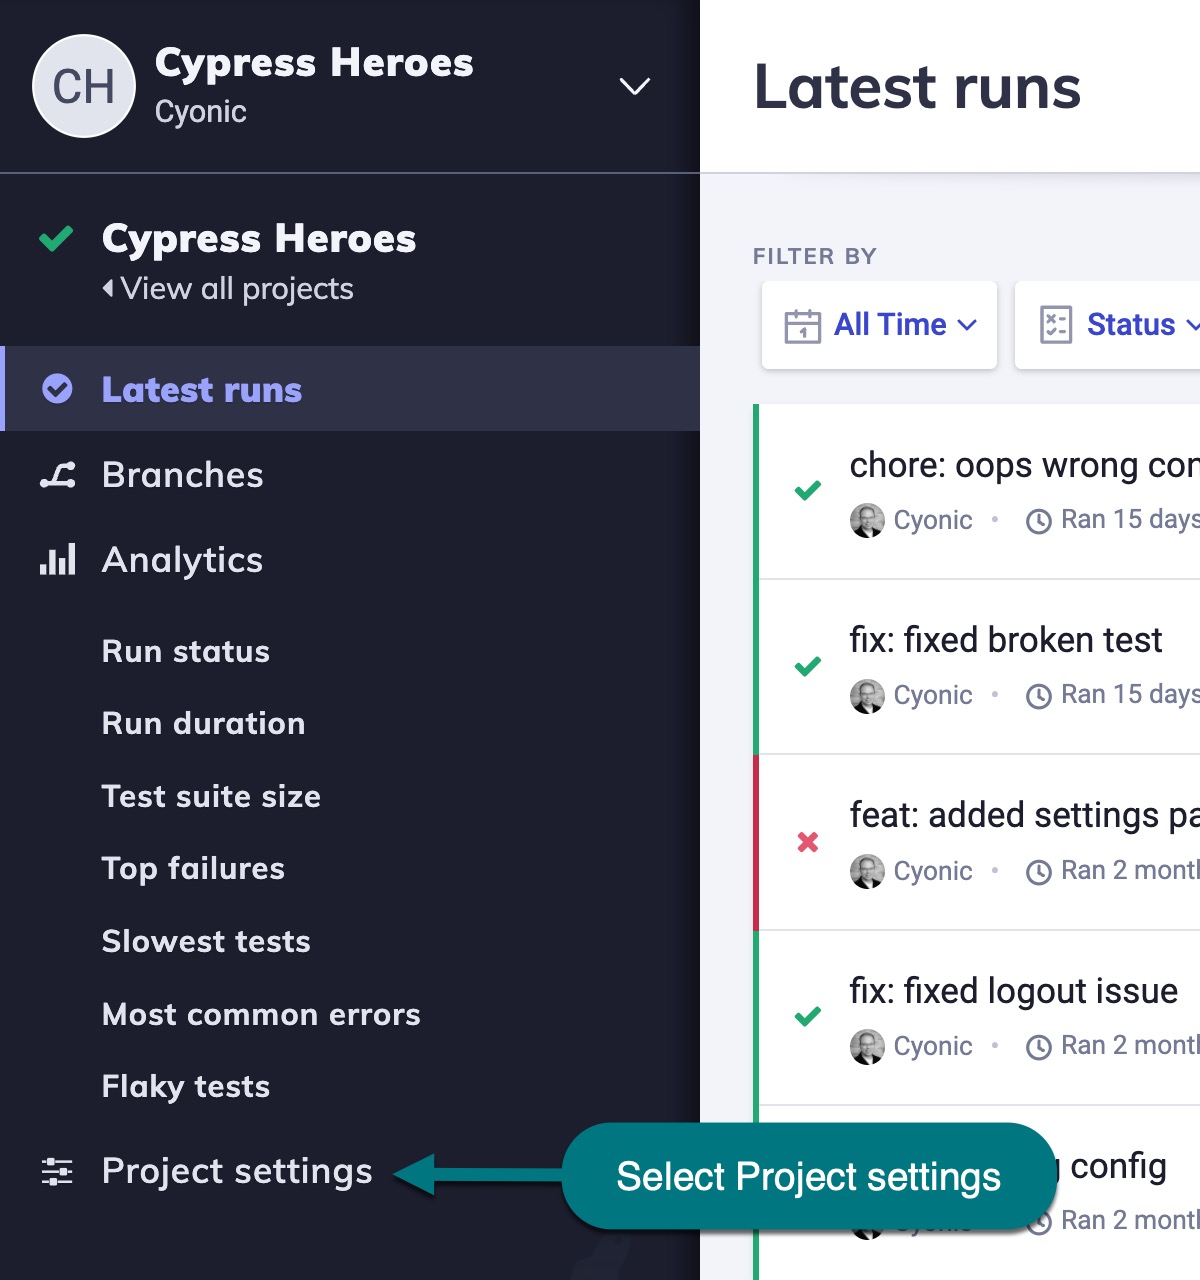
-
Go to the project's settings page and click the Integrations tab.
-
Scroll down and click Add Teams webhook in the Microsoft Teams section.
-
You'll navigate to a window that manages webhooks as a way for Cypress Cloud to communicate with Microsoft Teams. First, you must configure an Incoming Webhook to a Teams channel.
In Microsoft Teams:
-
Open the channel in which you want to add the webhook and select ••• from the upper-right corner.
-
Select Workflows from the dropdown menu.
-
Search for webhooks and select select webhook alerts to channel.
-
Select channel name from dropdown and click Save
- Copy and save the unique webhook URL present in the dialog. The URL maps to the channel and you can use it to send information to Teams.
The webhook is now available in the Teams channel. For more information, see Microsoft Teams - Create Incoming Webhooks.
-
-
Then, add the Teams webhook to your Cypress Cloud Project.
In Cypress Cloud:
-
Paste in the Teams webhook URL, choosing the types of notifications your team should receive.
Once you've configured and added your webhooks, the installation is complete! Cypress Cloud will post run results for this project to the specified Microsoft Teams channel.
-
Notification preferences
By default, Cypress Cloud will post a Teams message to each configured channel only for failing runs. However, you can select any combination of the followings preferences:
- Failed runs: notifies on runs with a failed or errored status.
- Passed runs: notifies on runs with a passed status.
- Canceled runs: notifies on runs with a canceled status.
- Timed out runs: notifies on runs with a timed out status.
- Flaky tests: notifies on runs that contain an identified flaky test.
To set notification preferences:
- Navigate to Teams configuration page
- Select the notification preferences for each channel
Flaky test alerts
The Flaky tests preference works independently from the run status preferences. This means you can configure a channel to receive notifications only when flaky tests are detected — even if you don't subscribe to passed or failed runs. See Example configurations for a concrete setup.
When flaky test alerts are enabled, the Teams message includes flaky test counts in the test results section and lists flaky specs alongside failed specs in the specs for review section.
Premium Cypress Cloud Feature
Flaky test detection requires the flaky test management feature to be enabled for your organization. See Flaky Test Management for more details.
Filter notifications by tag or run group
When configuring at the project-level, you can filter notifications posted to Teams based on a tag or group the run was recorded with. This is helpful for posting notifications only for certain runs, like those to a staging or release environment.
- Navigate to the Teams configuration page.
- Under Tags, select the Tag dropdown for the desired integration and select which tag(s) to filter. If more than one tag is selected, the Teams message will be sent if any of the tags were associated with the run.
- Under Run Groups, select the Run Group dropdown for the desired integration and select which run group(s) to filter. If more than one run group is selected, the Teams message will be sent if any of the run groups were associated with the run.
If both a tag and run group are selected, only a run associated with both criteria will trigger a message to be sent to Teams.
Message content
Each Teams notification includes run metadata and up to six configurable content sections. You can choose which sections appear in your messages and how they're displayed.
What's included in every message
Every run completion message includes the following run properties:
- Run title: The run number and commit message, linked to the run in Cypress Cloud.
- Run status: A color-coded status indicator (passed, failed, errored, timed out, or canceled).
- Project: The project name, linked to the project in Cypress Cloud.
- Branch: The branch name where the run was recorded.
- Commit author: The author of the commit that triggered the run.
- CI build: The CI provider and build number, linked to the CI build.
Configurable content sections
You can enable or disable any of the following content sections for each Teams channel:
- Test results: Shows pass, fail, skip, pending, and flaky counts. Each count links directly to the filtered view in Cypress Cloud.
- UI Coverage results: Shows the coverage percentage along with counts of tested and untested elements and links. Only appears when UI Coverage data is available.
- Accessibility results: Shows the accessibility pass percentage, failed rules broken down by severity (critical, serious, moderate, minor), and failed elements. Only appears when Cypress Accessibility data is available.
- Specs for review: Lists up to 10 failed and flaky spec files with clickable links, the count of failed or flaky tests in each, and the run group name. If there are more than 10, a link to see all specs is included.
- Run tags: Displays the tags associated with the run.
- Run groups: Displays the run groups associated with the run.
To configure message content:
- Navigate to the Teams configuration page.
- Adjust the content sections for each channel.
Display modes
You can choose between two display modes for your Teams messages:
- Stacked (default): Each test result status appears on its own line with an icon and count. This is easier to scan when there are many statuses.
- Compact: All status counts appear on a single line, saving vertical space in your Teams channel.
The display mode applies to the test results, UI Coverage, and accessibility sections.
Example configurations
The options above — notification preferences, tag and run group filters, content sections, display modes, and org-vs-project scoping — can be combined to build notification setups tailored to how your team works. Below are some common configurations.
Route notifications by environment
Create separate project-level channels for each environment and use tag filters to route runs to the right place. For example, a #staging-tests channel filtered to the staging tag with Failed runs and Passed runs enabled gives your QA team full visibility into staging health, while a #prod-alerts channel filtered to the production tag with only Failed runs enabled keeps production notifications focused on breakages.
Dedicated flaky test triage
Add a channel like #flaky-triage with only the Flaky tests preference enabled and no run status preferences selected. This channel will only receive a notification when a run contains flaky tests — regardless of whether the run passed or failed — so your team can triage new flake without the noise of every run result.
Slim CI bridge for high-volume projects
For projects with frequent CI runs, set up a channel with only the Test results content section enabled in Compact display mode. This gives your team a single-line pass/fail summary per run with a direct link to the CI build, keeping the channel scannable even at high volume.
Cross-team visibility with focused project channels
Configure an organization-level #cypress-results channel with Failed runs enabled so leadership and stakeholders can monitor test health across all projects. Then add project-level channels like #team-checkout-tests with additional content sections (specs for review, run tags) and extra notification preferences (passed runs, flaky tests) so individual teams get the detail they need for the projects they own.
Managing channels
Mute a channel
If you want Cypress Cloud to temporarily stop posting Teams messages to a certain channel, you can Mute that channel. This allows you to easily pause and resume notifications for a specific channel without losing the configuration you've put in place.
- Navigate to the Teams configuration page.
- Toggle the Active selector for each Teams channel you want muted.
Per-project muting for organization channels
If you have an organization-level Teams channel, you can mute it for specific projects without affecting other projects. This is useful when you want most projects to post to a shared channel but need to silence notifications for a particular project temporarily.
- Navigate to the Project Settings page for the project you want to mute.
- Click the Integrations tab.
- Toggle the mute setting for the organization-level Teams channel.
Toggling the mute on an organization-level install will clear all project-level mute overrides for that channel. If you're using per-project muting, be aware that changing the global mute state resets those overrides.