Address coverage gaps
Every recorded run gives UI Coverage a ranked map of your application: the interactive elements and links your tests exercised, the ones they missed, and a coverage score that tracks the trend. The Identify coverage gaps workflow is where you find that list and make it trustworthy. This guide is the other half of the workflow: turning those gaps into tests, and keeping them closed.
It's a loop you run each time you record:
- Confirm the gap is real, so you only spend effort on gaps worth testing.
- Close the gap with an AI-generated or hand-written test.
- Validate the result and lock it in so the gap can't quietly reopen.
Each pass feeds the next, because closing one gap often reveals the next set to work on.
This guide assumes UI Coverage is enabled and your tests are recording to Cypress Cloud. If you haven't set that up yet, start with the UI Coverage setup guide, then work through Identify coverage gaps.
Step 1: Confirm the gap is real
A report can list hundreds of untested elements, and not all of them are worth a test. Two quick checks decide what to close first, so your effort lands where it matters:
- Is it worth testing now? Prioritize by risk. The views behind your highest-value flows, such as checkout, login, and account settings, come before a rarely used admin screen, and a heavily used page with low coverage comes before a lightly used one. See Start with your lowest-scoring views for how to rank them.
- Is it a real gap? Some untested entries aren't holes in your suite. Third-party widgets like chat launchers and cookie banners, one control that a dynamic attribute split into many entries, and links to pages you'll never test all count against your score without pointing to missing coverage. Ruling these out with configuration is faster than writing a test, and it keeps the remaining gaps meaningful.
Which option to reach for depends on what you're ruling out:
- Reduce noise: consolidate one control that appears as many entries, or too many near-identical pages, so the count reflects real coverage.
- Ignore elements: remove third-party widgets and out-of-scope controls from the report and score entirely.
- Ignore views and links: remove whole pages, and the links pointing to them, that you don't intend to test.
Step 2: Close the gap
Once a gap is worth closing, you have a fast automated path and a set of hand-written patterns for the cases your tests don't cover.
Draft tests with an AI agent ✨
If you use an AI coding assistant, Cypress Cloud MCP lets your agent pull UI Coverage data directly into your editor. You can ask it to identify the untested elements on a specific view and write targeted tests for them, combining Cloud data with your local code in a single workflow. For example prompts and review patterns, see Work with AI agents.
Close a coverage gap with your AI assistant
Copies a ready-made prompt that has your AI coding assistant pull the untested elements for a view from Cypress Cloud and draft a targeted test in your existing spec.
Using Cypress Cloud, pull the UI Coverage report for the latest run on this branch. For the /checkout view, list the untested interactive elements in priority order. Then draft a Cypress test that exercises the highest-priority one, following the setup, custom commands, and conventions in my existing specs, and tell me which spec file to add it to.
Generate tests from UI Coverage reports ✨
Test Generation uses AI to draft a Cypress test for an untested interactive element, following the setup and conventions your existing specs already use.
It works in three steps:
- In your UI Coverage report, select an interactive element (tested or untested), from any view or snapshot where it appears.
- Click Generate test code.
- In the popover, choose a spec from the list of specs where that element already appears. Cypress generates the test against that spec's setup and shows the code.
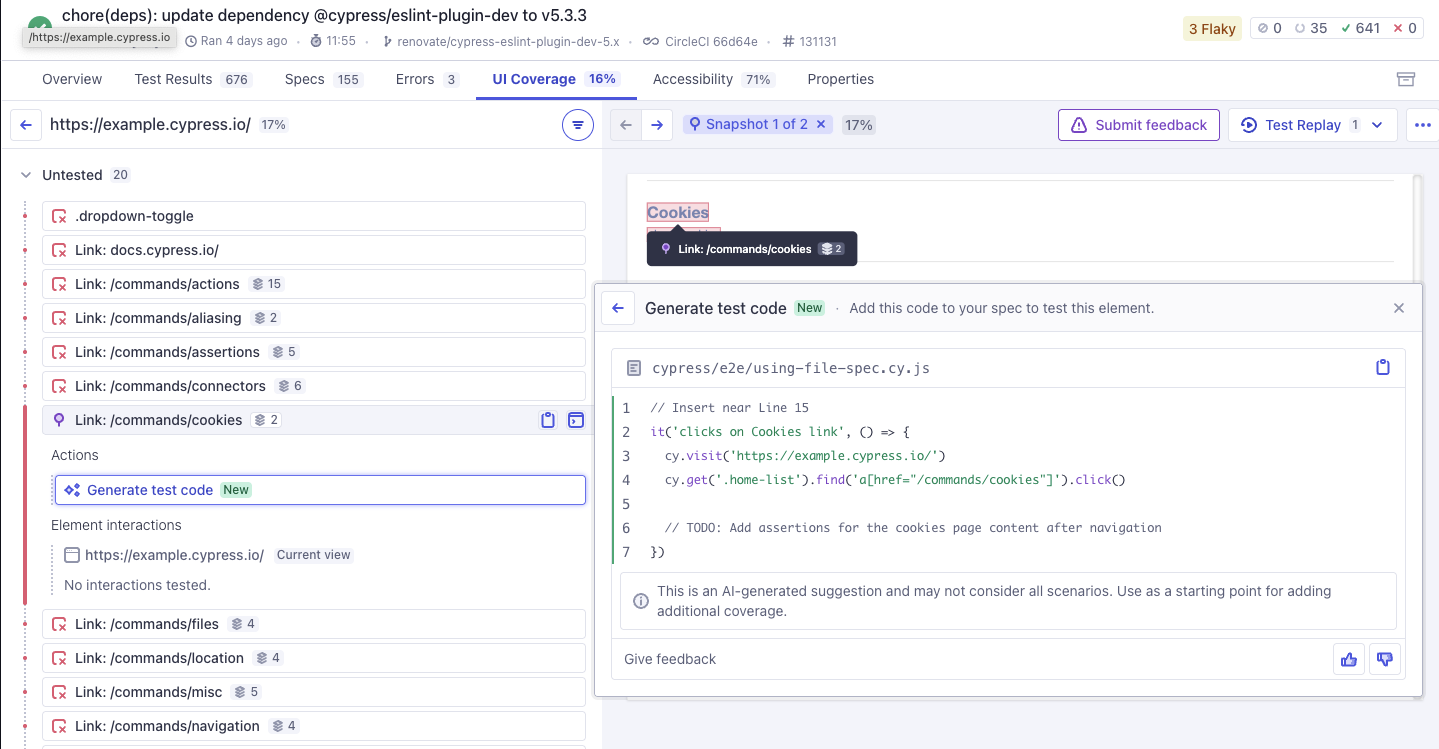
The generated test reproduces the setup needed to reach the element, reusing the same navigation and custom commands your specs rely on (such as cy.login() or cy.setupCart()) rather than inlining their steps. It then performs an interaction appropriate to the element type, adds an "Insert near line ..." hint for where the code belongs, and ends with a TODO comment marking where to add the assertions that verify behavior.
Copy the snippet into the suggested spec and continue from there. Treat it as a reviewed starting point, not a finished test: it exercises the element so UI Coverage counts it, and you add the assertions that prove the flow actually works.
Write a test for an untested element
When you'd rather write the test yourself, copy the element's selector straight from the report with the Copy element selector action, then target it in a focused test. Add an assertion so the test verifies behavior instead of only marking the element tested:
describe('Cart', () => {
  it('saves an item for later', () => {
    cy.login() // custom command that sets up an authenticated session
    cy.visit('/cart')

    // Interact with a previously untested element
    cy.get('[data-cy="save-for-later"]').first().click()

    // Assert the outcome so the test proves the flow works
    cy.get('[data-cy="saved-items"]').should('contain', 'Wireless Mouse')
  })
})
An element is marked tested once a recognized interaction command targets it, so a single flow naturally covers every element it exercises on the way through.
The same approach applies to component tests. There a view is a spec file rather than a URL, so instead of navigating with cy.visit() you mount the component and interact with the untested element inside the spec:
cy.mount(<CartItem product={{ name: 'Wireless Mouse' }} />)
cy.get('[data-cy="save-for-later"]').click()
cy.get('[data-cy="saved-badge"]').should('be.visible')
Reach untested pages and hidden elements
The methods above work on elements that already appear in a report. Some gaps don't appear yet, so there's nothing to generate from or select:
- The page was never visited.
- The element only renders in a state your tests never reached.
Reach that state first, and the element enters the report where the methods above can close it. Start with untested links, since visiting one page can surface a whole set of new elements to work through.
Cover untested links
The Untested links section surfaces pages your suite links to but never visits. Because no test has been to these pages, UI Coverage has nothing to report on them yet. Add navigation so the pages render and their elements enter the report:
describe('Support pages', () => {
  it('renders the returns page', () => {
    cy.visit('/returns')
    cy.get('h1').should('be.visible')
  })

  it('renders the shipping page', () => {
    cy.visit('/shipping')
    cy.get('h1').should('be.visible')
  })

  it('renders the gift cards page', () => {
    cy.visit('/gift-cards')
    cy.get('h1').should('be.visible')
  })
})
Visiting a page is the starting point: it turns the untested link green and creates a view for the page, which then surfaces its own untested elements for you to work through on the next pass of this loop.
Reveal hidden and state-gated elements
Some elements show up as untested only because your tests never render them. A control inside a collapsed menu, a modal, or a section that only appears after signing in won't be exercised until your test puts the UI into that state. Drive the interaction that reveals the element, then interact with it:
// The filters panel is collapsed until its toggle is clicked
cy.get('[data-cy="filters-toggle"]').click()
cy.get('[data-cy="filter-in-stock"]').check()
Each new state your tests reach adds its snapshot to the report, so elements that were never rendered start showing up as tested or untested.
Step 3: Validate and lock in your coverage
Closing a gap only sticks if you confirm it and keep it from reopening.
Confirm the gap is closed. Record a new run with your added tests, then reopen the report and check that the elements you targeted now appear as tested, the untested links you covered are gone, and the score for the affected views has risen. To see exactly what changed against the previous run, use Branch Review to compare the two reports side by side.
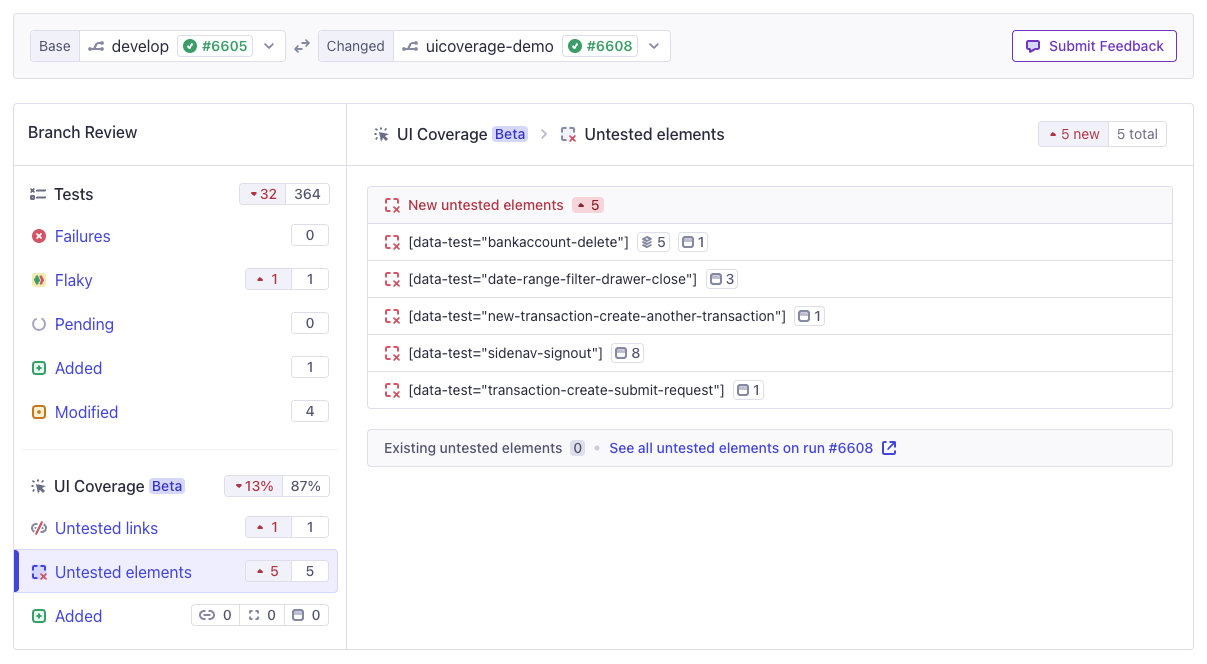
If you only changed configuration in Step 1, you don't need to rerun your tests: regenerate a recent run from its Properties tab to apply the new rules.
Keep it closed. Wire the Results API into CI so a future change can't quietly reintroduce the gap. A short script can fail the build when overall coverage drops below a threshold, or hold a critical view like /checkout to a higher bar:
const { getUICoverageResults } = require('@cypress/extract-cloud-results')

getUICoverageResults().then((results) => {
  const { summary, views } = results

  if (summary.coverage < 80) {
    throw new Error(
      `Project coverage is ${summary.coverage}%, below the 80% threshold.`
    )
  }

  const checkout = views.find((view) => view.displayName === '/checkout')
  if (checkout && checkout.coverage < 95) {
    throw new Error(
      `Checkout coverage is ${checkout.coverage}%, below the required 95%.`
    )
  }
})
See Block pull requests and set policies for the full pattern, including comparing a run against a stored baseline so you can fail only on newly introduced gaps.
Repeat the loop. Coverage is a moving target: every feature adds interactive elements, and a page you visit for the first time surfaces its own untested elements. Run this loop (confirm, close, validate) whenever you record a run, and share the report with your team so the work of closing gaps is distributed and the priorities are agreed on together.
See also
- Identify coverage gaps: read the report and find the gaps this guide closes.
- Compare reports with Branch Review: see exactly which elements changed between two runs.
- Reduce test duplication: once gaps are closed, trim redundant tests so your suite stays fast.
- Monitor changes: track coverage over time and catch regressions before they merge.
- Work with AI agents: use Cypress Cloud MCP to summarize gaps and draft targeted tests from your editor.